Contact us
 Customer Area


 Visit LWS
Rate this article :
5/5 | 2 opinion
This article was useful to you ?
 Yes
Yes
 No
No
 Article read
15963 once
Article read
15963 once Merci ! N'hésitez pas à
poser des questions sur nos documentations si vous souhaitez plus d'informations et nous aider à les
améliorer.
Merci ! N'hésitez pas à
poser des questions sur nos documentations si vous souhaitez plus d'informations et nous aider à les
améliorer.Vous avez noté 0 étoile(s)



Sommaire
Procédure
Service concerned: Windows ASP.NET Hosting
Panel concerned: Plesk
Level: beginner to intermediate
This help explains how to install a free Let’s Encrypt SSL/TLS certificate on a domain from Plesk.
Once installed, the certificate allows your site to be displayed over HTTPS and encrypts exchanges between the visitor’s browser and your site.
An SSL/TLS certificate does not secure the site itself: it does not fix vulnerabilities in the code, does not automatically protect a CMS such as WordPress or PrestaShop, and does not guarantee that the site owner is trustworthy.
Let’s Encrypt certificate renewal is automatic. You therefore do not need to renew it manually as long as the domain remains correctly configured.
This help concerns Plesk.
Are you using another environment?
The presence of HTTPS is not enough to prove that a site is legitimate. Fraudsters can create a fake shop with a valid SSL/TLS certificate: exchanges will be encrypted, [PERSON_NAME] not that the order will be delivered or that the entered data will be used correctly.
If you visit a site or an online store, check the legal notices, the actual existence of the company, its contact details, [PERSON_NAME] reliable external sources.
An SSL/TLS certificate encrypts exchanges between the site and the browser. It does not fix a site’s security flaws, does not automatically protect a CMS such as WordPress or PrestaShop, and it remains important to keep the site up to date and fix security vulnerabilities.
The domain must point correctly to your Plesk hosting before requesting the certificate.
If you want to install a wildcard certificate, that is, a certificate that also covers subdomains, you must be able to modify the domain’s DNS zone. If the DNS zone is not managed in Plesk or at LWS, the requested record must be added with the provider that manages the domain’s DNS.
If you have just changed the DNS or domain pointing, you may need to wait a few hours for DNS propagation to complete before generating the certificate.
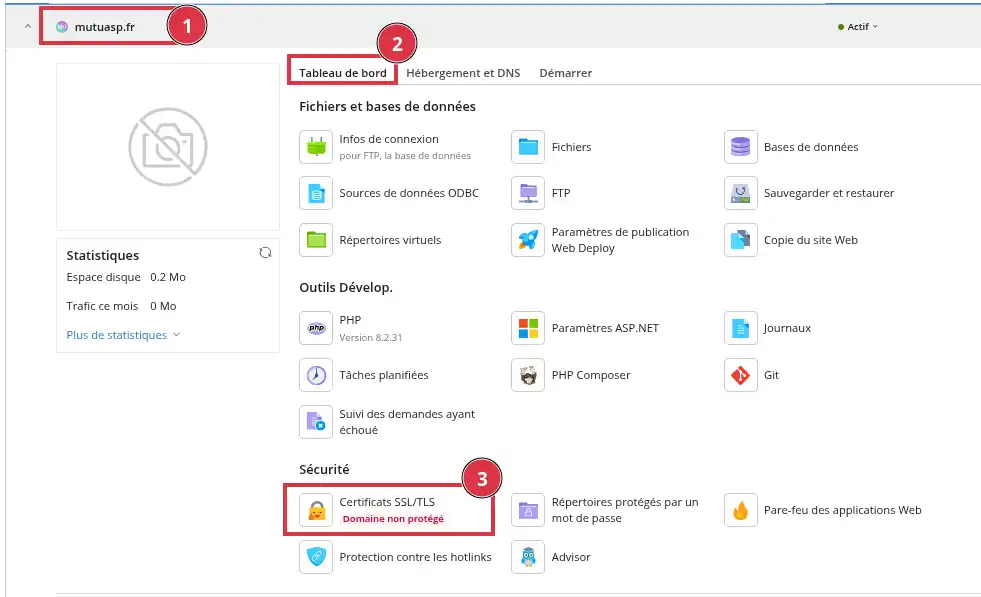
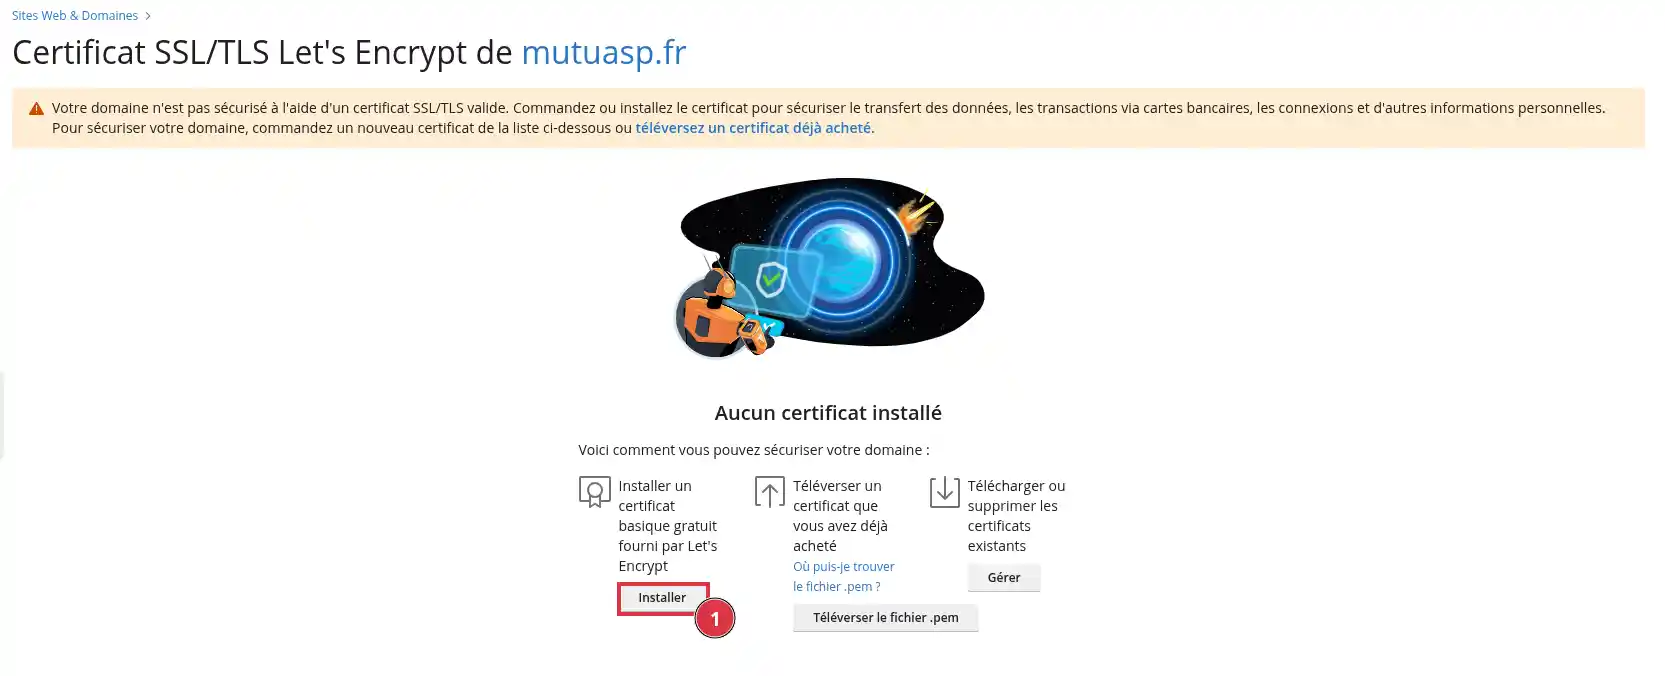
If no certificate is installed, Plesk displays a message indicating that the domain is not yet protected.
votredomaine.fr.www.votredomaine.fr.blog.votredomaine.fr, boutique.votredomaine.fr or webmail.votredomaine.fr.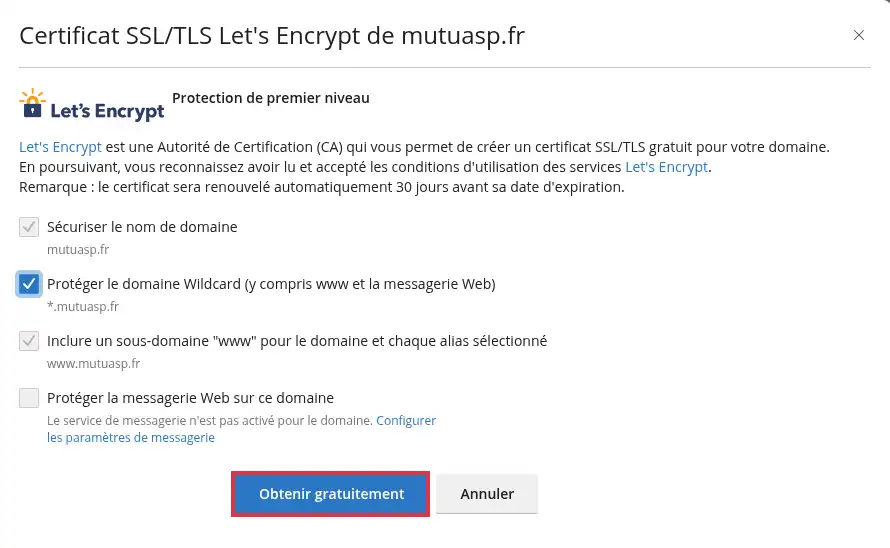
You can install a certificate for the main domain only, for the main domain with www, or for the domain and its subdomains with a wildcard certificate.
If you want [PERSON_NAME] later, you will need to regenerate the certificate after its initial installation.
Plesk [PERSON_NAME] TXT DNS record.
This step allows Let’s Encrypt to confirm that you [PERSON_NAME] domain.
Plesk then displays the information to use, for example:
_acme-challenge.votredomaine.fr;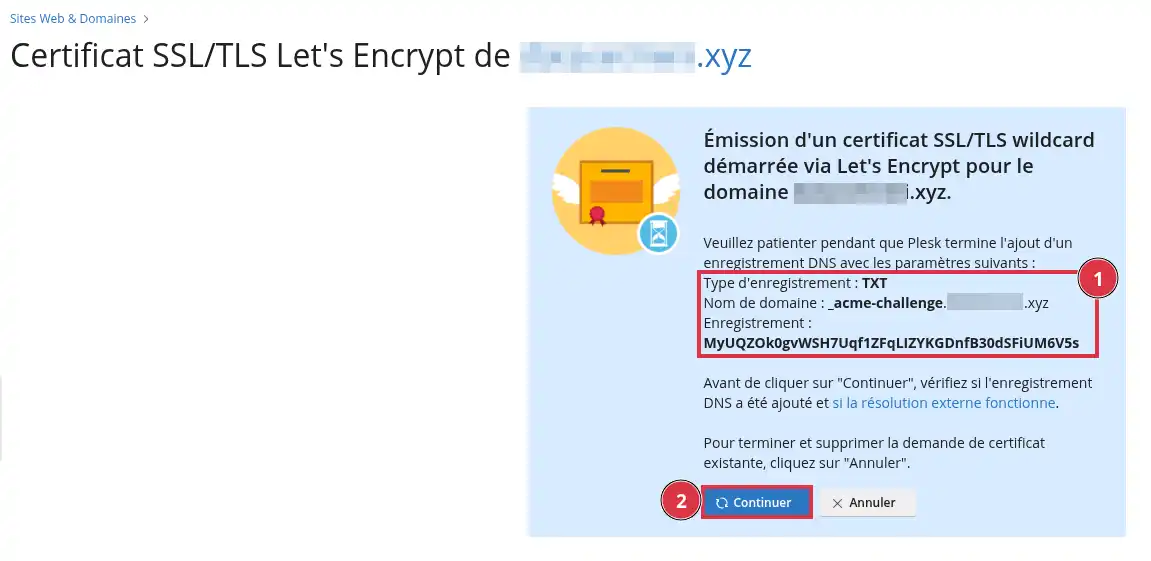
If your DNS zone is managed in Plesk, check that the requested TXT record is present under Websites & Domains > DNS Settings.
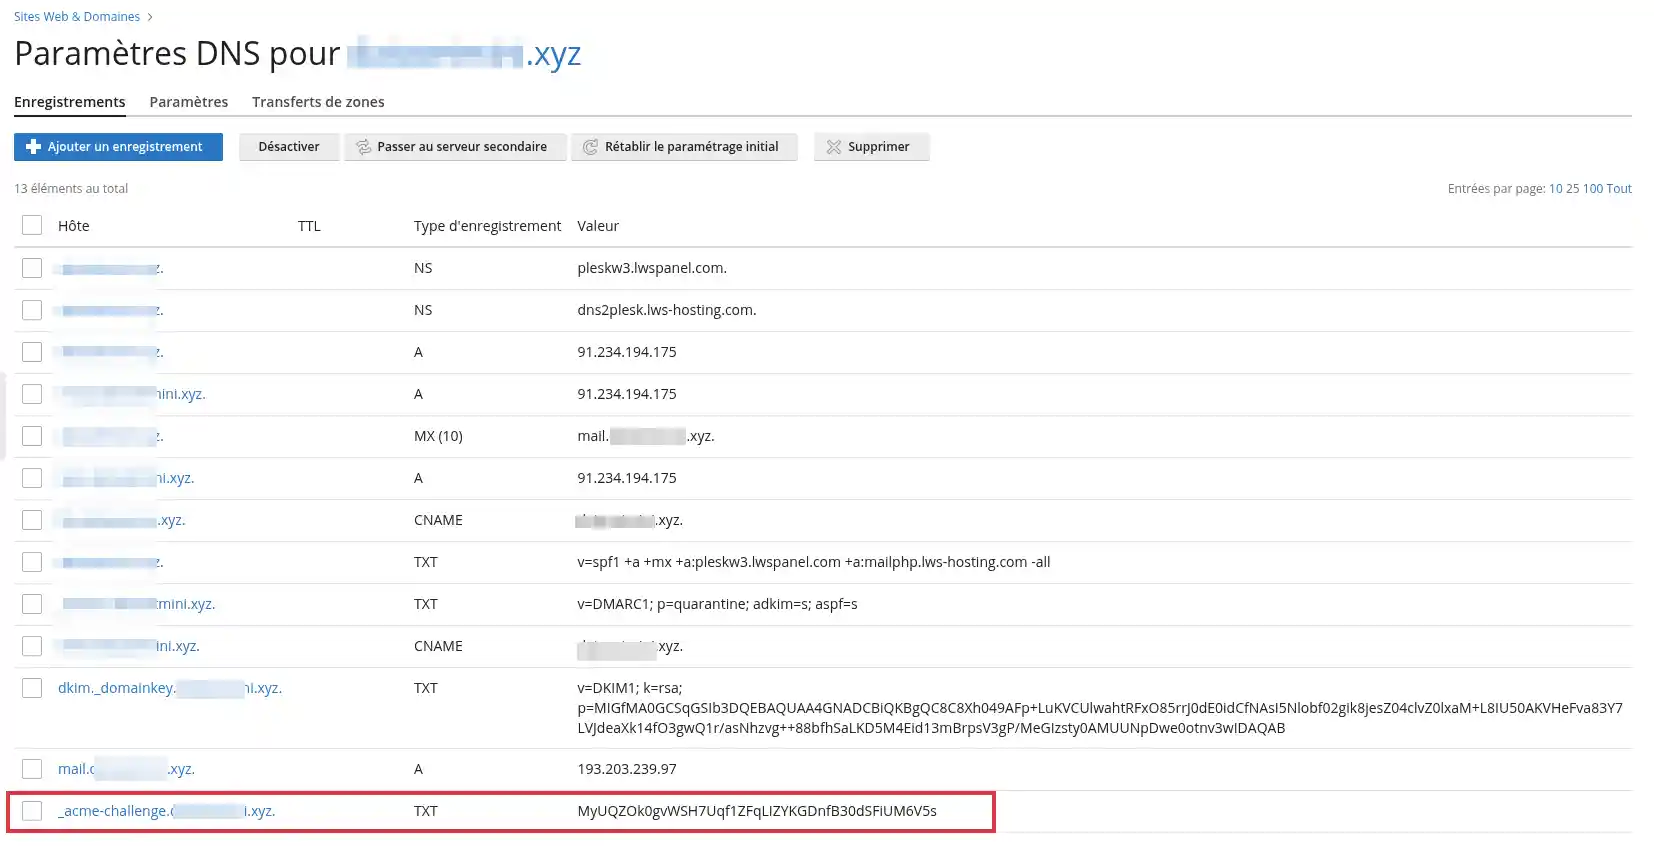
If your DNS zone is managed elsewhere, [PERSON_NAME] with the provider that manages the domain’s DNS.
After adding the TXT record, [PERSON_NAME] 10 minutes before clicking Continue.
[PERSON_NAME] to allow the DNS record to propagate properly.
Once the wait is over, return to Plesk and click Continue.
When the certificate is installed, Plesk displays the protected components with the status Secured. The Let’s Encrypt certificate will then be renewed automatically before it expires.
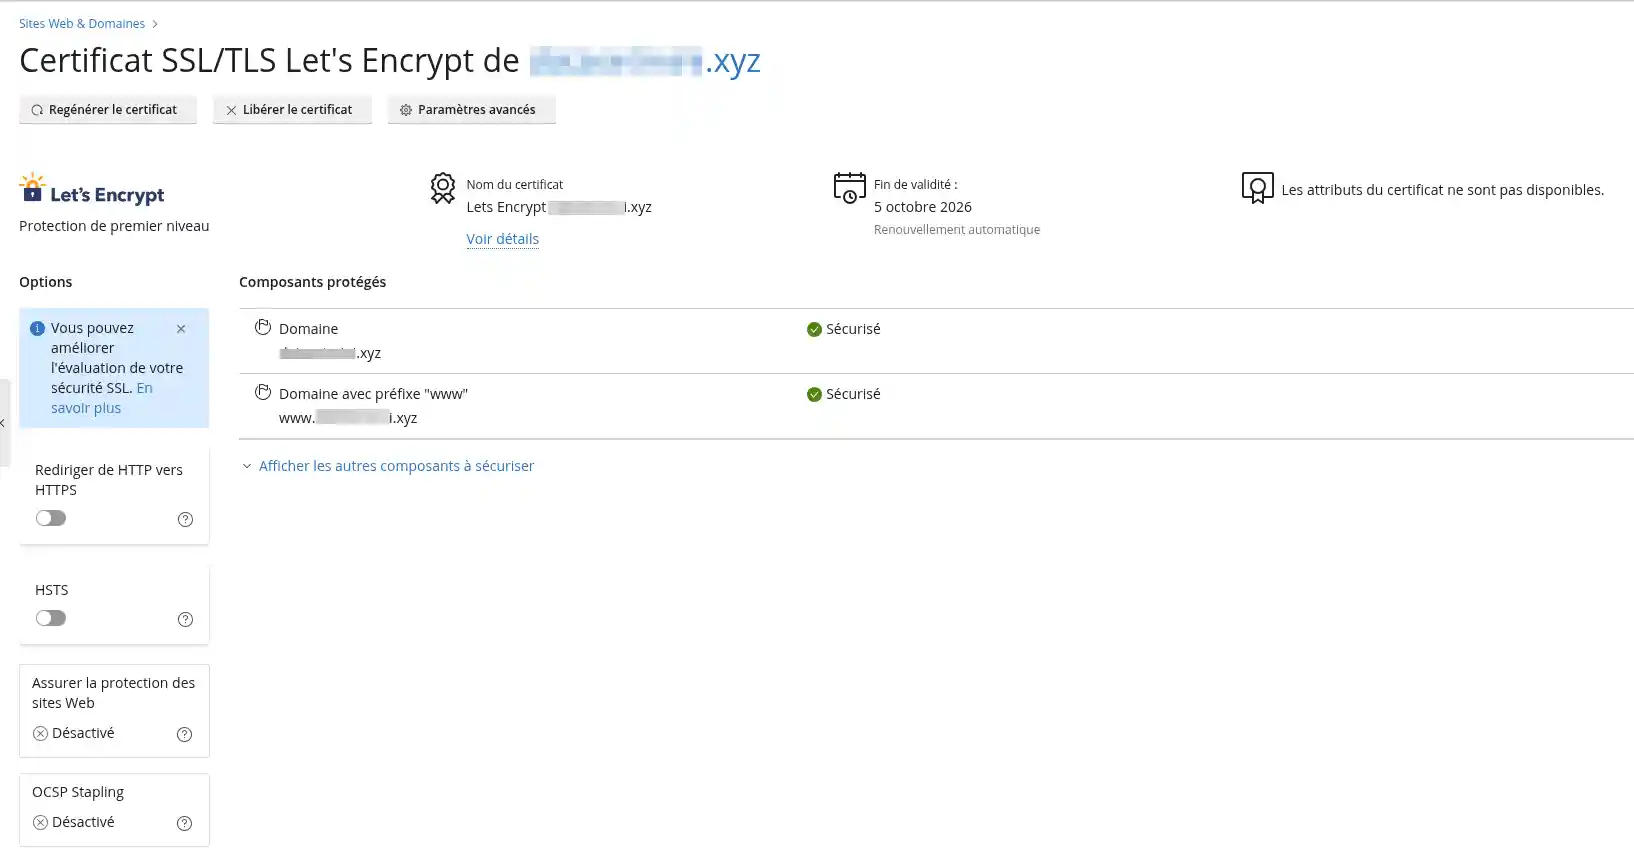
Installing the certificate allows the site to work over HTTPS, but it does not always automatically force visitors to use this secure address.
To automatically redirect visitors from http:// to https://:
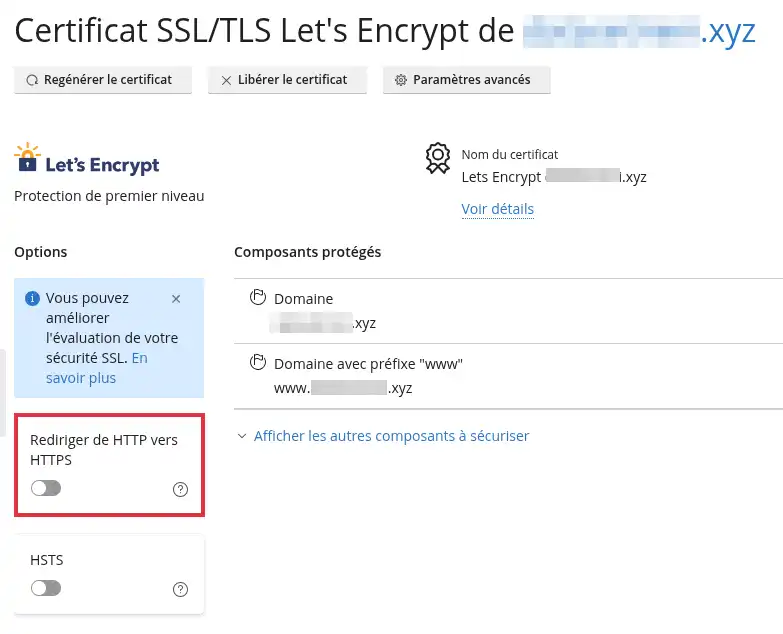
HSTS is an option that tells browsers [PERSON_NAME]>
This option strengthens the use of HTTPS, but it must be enabled with caution.
Enable HSTS only if your site already works correctly over HTTPS.
If you check Include subdomains, make sure that all affected subdomains also have a valid SSL/TLS certificate. Otherwise, some subdomains will not be accessible from browsers that have recorded the HSTS rule.
To enable HSTS:
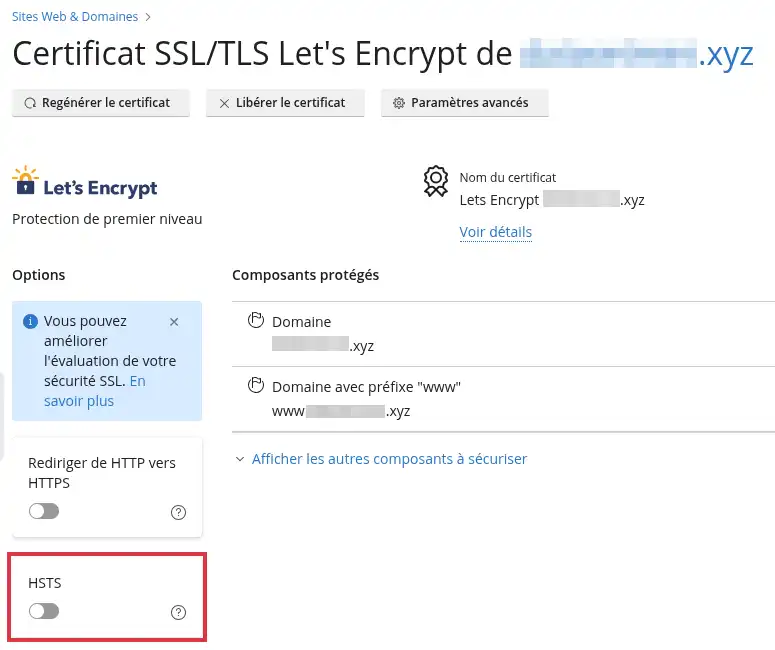
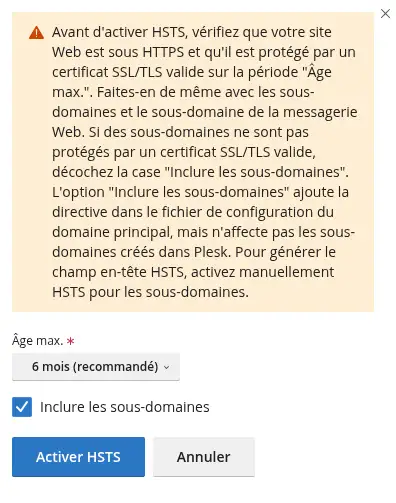
The Include subdomains option adds a directive in the main domain’s configuration. It does not create an SSL/TLS certificate for subdomains that do not have one.
After installation, open your site in a browser using the following address:
https://votredomaine.fr
Then check:
https://www.votredomaine.fr works if you included www;If you enabled HTTP to HTTPS redirection, [PERSON_NAME] :
http://votredomaine.fr
The browser should automatically switch to:
https://votredomaine.fr
If you want to modify the elements protected by the certificate, for example add www or switch from a standard certificate to a wildcard certificate, you must regenerate the certificate.
To do this:
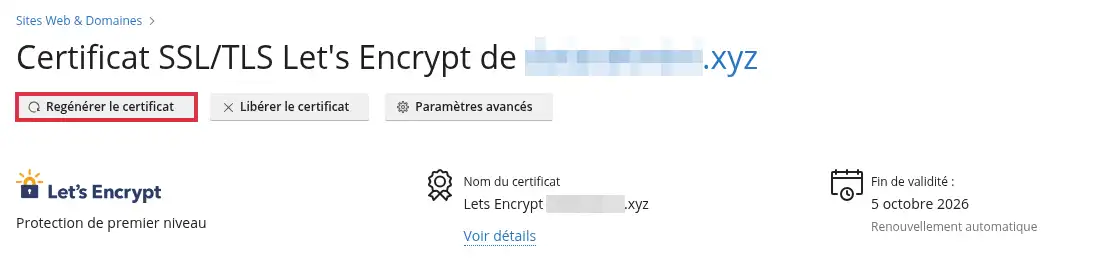
The certificate does not install and Plesk displays a DNS error
If Plesk displays an error such as DNS problem or NXDOMAIN, [PERSON_NAME] Let’s Encrypt cannot find the correct DNS pointing for your domain.
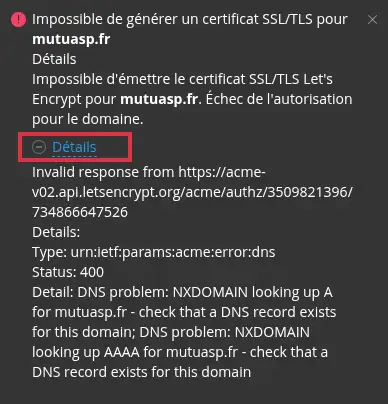
Check that:
After correcting this, restart certificate generation.
Plesk requests a TXT record but the certificate fails
Check that the TXT record was added exactly as indicated by Plesk.
In particular, check:
_acme-challenge;Then wait about 10 minutes before clicking Continue again.
My site still shows as unsecured
The certificate may be installed correctly, but the browser may still display a warning if the site loads elements over HTTP, such as images, scripts, or stylesheets.
In this case, check that the site’s internal links use HTTPS. On a CMS such as WordPress or PrestaShop, it may be necessary to change the site address in the settings or fix mixed content.
The subdomain is not protected
A certificate installed only for the main domain does not automatically protect all subdomains.
To protect a [PERSON_NAME], you must either include it in the certificate when Plesk offers it, or use a wildcard certificate.
If the certificate is already installed without [PERSON_NAME], regenerate it with the correct options.
HTTPS redirection does not work
Check that the Redirect from HTTP to HTTPS option is enabled in SSL/TLS Certificates.
If your site uses a CMS, a redirection rule present in the .htaccess or web.config or file or in an extension can also change the expected behavior.
Rate this article :
5/5 | 2 opinion
This article was useful to you ?
Yes
No
0mn reading
How do I create an FTP user in Plesk?
3mn reading
How do I change the FTP password in Plesk?
13mn reading
How do I install a CMS from Plesk?
0mn reading
FTP connection problem: Error 530 User cannot log
 About LWS :
LWS is a 100% French web hosting company that focuses on quality and innovation and offers a responsive and competent technical service at affordable prices.
About LWS :
LWS is a 100% French web hosting company that focuses on quality and innovation and offers a responsive and competent technical service at affordable prices.