
Online help
The web host accessible to all
Procédure
GitLab is a powerful tool for managing your various Git repositories with ease. However, setting it up on our operating systems with ISPConfig 3 can easily become a headache. That's why we've decided to provide you with a complete manual for this operation.
GitLab requires at least 2 GB of RAM. Combined with the minimum 2 GB of ISPConfig 3, the number of processes executed (representing almost 30% of the quota for ISPConfig alone without any website), theVPS L offering from the LWS Starter range is sufficient for small projects, but we recommend the VPS Pro range for any professional project.
For this tutorial, we're going to use a VPS running the blank Debian 9 + ISPConfig 3 operating system offered on the LWS Panel. Here are the links to other tutorials for other operating systems:
If you want to change the operating system on your VPS, here's a link to the help documentation: How do I change the operating system on my VPS?
Please note that this tutorial has only been tested on a VIRGIN installation of Debian 9 + ISPConfig. If you have already installed websites or other services on your VPS, we cannot guarantee that the tutorial will be effective and/or that all your other services will be functional after installation.
Don't forget to enable the SSH port on your VPS firewall and to disable SSH management so that you can connect as root to the SSH console.
This tutorial covers the following steps:
Before installing anything, we recommend that you update the list of packages and the packages themselves. On your SSH console, write the following commands:
apt-get update
apt-get upgrade -y
apt-get dist-upgrade -y
We can also update ISPConfig.
First, let's install the dependencies required by Gitlab:
apt-get install -y curl openssh-server ca-certificates
Next, add the Gitlab repository to your VPS:
curl https://packages.gitlab.com/install/repositories/gitlab/gitlab-ee/script.deb.sh | bash
Now let's install Gitlab on port 6080 (a randomly chosen port):
EXTERNAL_URL="http://vpsXXXXX.lws-hosting.com:6080" apt-get install gitlab-ee
Installation takes several minutes, so you can have a cup of tea while you wait.
Tip: if you have an unstable Internet connection, you can use screen to reconnect to the detachable console in the event of an unexpected disconnection. Documentation on how to use screen.
The installation will fail. This is perfectly normal. This is because Gitlab will attempt to make changes to the kernel, but these changes are not authorised on LWS VPS servers due to the virtualisation technology used. To get around this, you need to "touch" (run the touch command) the Kernel configuration files prospected by Gitlab to empty their contents so that you can continue with the installation:
touch /opt/gitlab/embedded/etc/90-omnibus-gitlab-kernel.sem.conf touch /opt/gitlab/embedded/etc/90-omnibus-gitlab-kernel.shmall.conf touch /opt/gitlab/embedded/etc/90-omnibus-gitlab-kernel.shmmax.conf touch /opt/gitlab/embedded/etc/90-omnibus-gitlab-net.core.somaxconn.confIf there are other configuration files, feel free to empty them of their contents. Then run the following command to regenerate the Gitlab configurations:
gitlab-ctl reconfigureNow you need to stop GitLab which, from what you've been able to check, isn't working at all:
gitlab-ctl stopThe problem comes from the unicorn module, which uses the same port as ISPConfig. So we're going to change its port by editing the /etc/gitlab/gitlab.rb file:
nano /etc/gitlab/gitlab.rband edit the following line:
# unicorn['port'] = 8080 unicorn['port'] = 8083Before, it was a comment and 8080 was the value. Now we've uncommented it and set 8083 as the port. Let's recreate the configuration files:
gitlab-ctl reconfigureNow we need to restart Gitlab:
gitlab-ctl restartTip: If unicorn refuses to start, there are child processes that have not yet been closed. Close them with gitlab-ctl stop then try again.
To secure access to Gitlab, we are going to create a Let's Encrypt SSL certificate which will then be installed on the reverse proxy.
Note: We are not going to install the SSL certificate on Gitlab. We are only going to secure access to its reverse proxy. Gitlab will only be accessed via the reverse proxy, so we can save our VPS extra computing effort by encrypting traffic that will not leave the VPS.
To do this, we first need to point git.example.com to your VPS. Then we'll use certbot:
certbot certonly --webroot -w /usr/local/ispconfig/interface/acme/ -d git.exemple.comNote: ISPConfig (thanks to its vhost and its .conf for Apache) directly redirects requests containing /.well-known/ to /usr/local/ispconfig/interface/acme/. So we're using webroot authentication and we're using the ISPConfig folder provided for this purpose. This will avoid interfering with ISPConfig during renewals.
If this is the first time you have created a Let's Encrypt SSL certificate on your VPS, you should enter an email address and accept the Let's Encrypt terms of use.
Now we need to configure the reverse proxy with Apache, which will coexist with ISPConfig and the associated sites. So we're going to create a new configuration file :
nano /etc/apache2/sites-available/gitlab.confand we'll need to add the following content :
ServerName git.exemple.com ServerAdmin root@git.exemple.com RewriteEngine On RewriteRule ^/?(.*) https://%{SERVER_NAME}/$1 [R,L]
ServerName git.exemple.com ServerAdmin root@git.exemple.com ProxyRequests Off ProxyPreserveHost On ProxyVia Full Require all granted
And let's activate this new vhost :
ln -s /etc/apache2/sites-available/gitlab.conf /etc/apache2/sites-enabled/000-gitlab.confBut before restarting Apache, you need to activate the necessary modules:
a2enmod proxy a2enmod proxy_httpNow restart Apache :
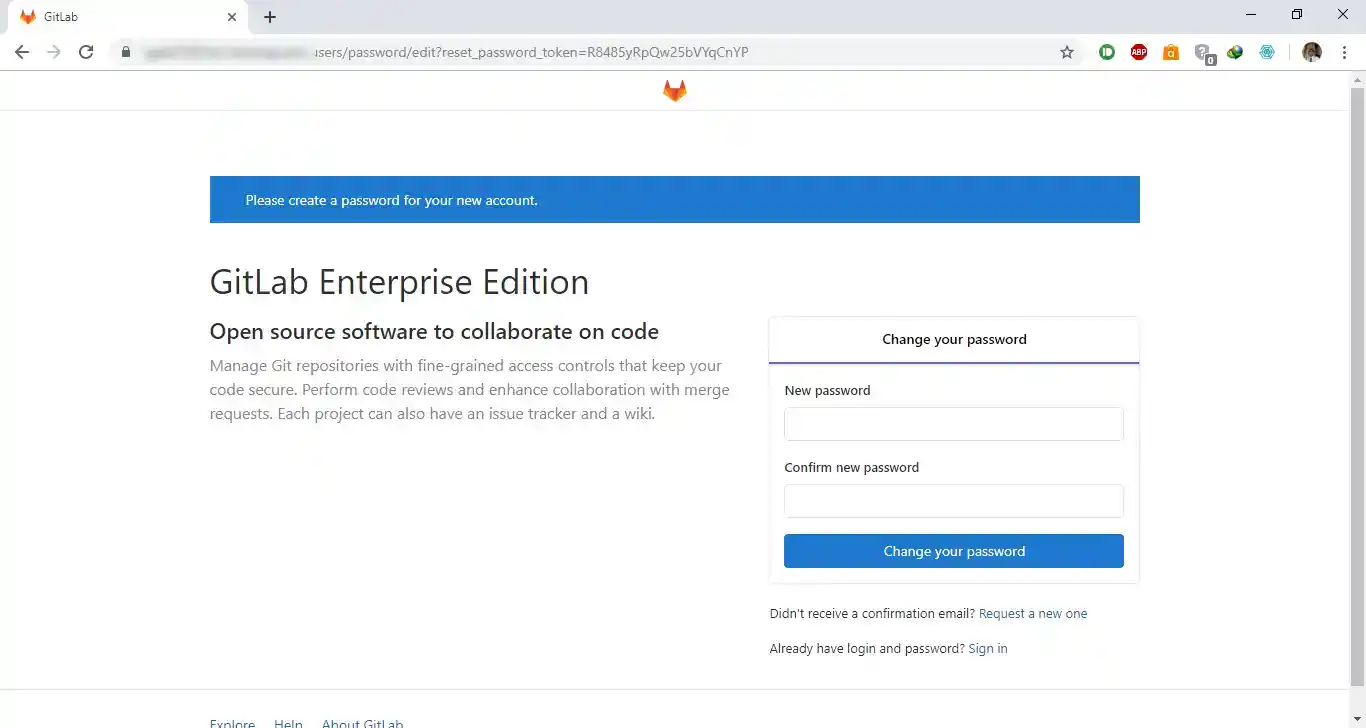
systemctl restart apache2And that's it. If you go to git.example.com, you'll see that Gitlab is ready:
Ask the LWS team and the community. Answers are published after moderation.
 About LWS :
LWS is a 100% French web hosting company that focuses on quality and innovation and offers a responsive and competent technical service at affordable prices.
About LWS :
LWS is a 100% French web hosting company that focuses on quality and innovation and offers a responsive and competent technical service at affordable prices.



 Yes
Yes No
No