
Online help
The web host accessible to all
Procédure
On an LWS Panel hosting account, the “Error Pages” tool lets you display your own page instead of the server’s standard error page for 401, 402, 403, and 404 errors. It stores nothing on your hosting account: it generates the ErrorDocument lines, which you then add yourself to the .htaccess file at the root of your site.
The “Error Pages” tool offers errors 401, 402, 403, and 404.
Explanation of error 401, Unauthorized
The request requires user identification. In practical terms, this means that all or part of the contacted server is protected by a password that must be provided to the server in order to access its content.
Explanation of error 402, Payment Required
This code is reserved by the HTTP standard and is very rarely used by websites.
Explanation of error 403, Forbidden
The HTTP server understood the request, but refuses to process it. (The error appears when no index.html, htm, or PHP page has been found at the root of the FTP account)
This code is generally used when a server does not wish to indicate why the request was rejected, or when no other response matches (for example, the server is an intranet and only machines on the local network are allowed to connect to the server).
Explanation of error 404, Not Found
The server found nothing matching the requested address (URL).
This means that the URL you typed or clicked is wrong or outdated and does not correspond to any existing document on the server (you can try gradually removing the components of the URL starting from the end to possibly find an existing path).
First create the page to display (for example a 404.html file, or a .htm or .php page), then upload it to your site using the file manager or via FTP.
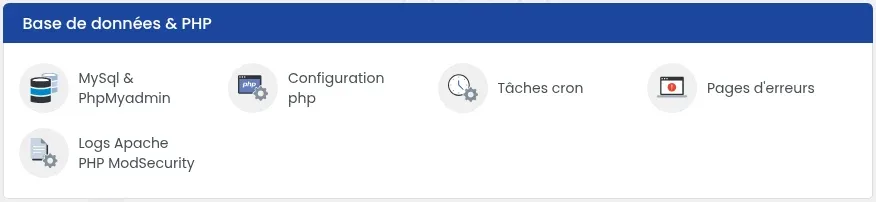
Log in to your hosting account, then in the “Databases & PHP” section of the dashboard, click Error Pages.
On the “Customize your 404, 403, 402 and 401 error pages” page, fill in the fields for errors 401, 402, 403, and 404 with the location of your pages, then click Generate. The code appears in the “Your generated .htaccess file” area.
The fields are prefilled with examples (https://my-example-site.com/…): a generated line that still contains “my-example-site.com” must be deleted.
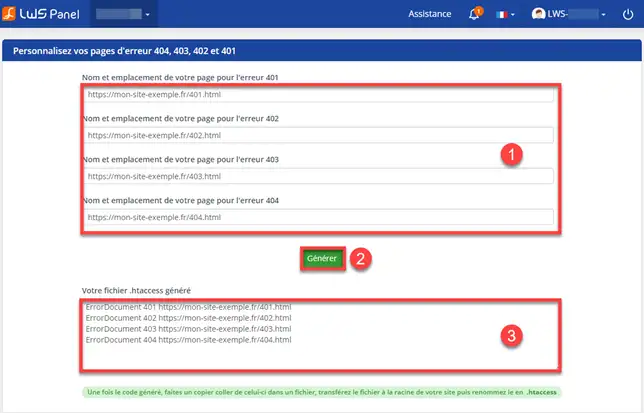
Copy the generated lines (one ErrorDocument line per error), then add them to the end of the .htaccess file at the root of your site, for example using the file manager. If this file does not yet exist, create it as indicated in the green box on the page: paste the code into a file, upload it to the root of your site, then rename it to .htaccess.
Open in your browser an address on your site that does not exist (for example your domain followed by /nonexistent-page): your custom 404 page should display instead of the standard error page.
To return to the standard error page, delete the corresponding ErrorDocument line from your .htaccess file.
Note: this procedure currently does not work with not found files having the .php extension
When designing a website, it can happen that your visitors land on a page on your site that no longer exists. For example, when you create the site www.example.com. On this site, there are of course several pages... And, as your site becomes better known, other websites place your links on their pages. However, if you modify this page, the visitor will then land on an error page.
You are now able to create custom error pages on your shared hosting with LWS.
Feel free to share your feedback and questions!
Ask the LWS team and the community. Answers are published after moderation.
 About LWS :
LWS is a 100% French web hosting company that focuses on quality and innovation and offers a responsive and competent technical service at affordable prices.


 Yes
 No