Transfer a SQL Server database between Plesk and a SQL Server server with SSMS

Procédure


Service concerned: Windows ASP shared hosting
Concerned panel: Plesk
Level: intermediate

This guide explains how to transfer a Microsoft SQL Server database in both directions: from your Plesk hosting to another SQL Server, or from a SQL Server to Plesk.

SQL Server Management Studio, also known as SSMS, is used to create or restore the backup file used for the transfer. This procedure is based on the SSMS 22 interface and remains valid for its 22.x updates. Microsoft recommends using the latest available update.

Before you begin

To follow this procedure, you must have:

  • a Microsoft SQL Server database on your Plesk hosting;
  • SSMS 22 installed on a Windows computer;
  • a local or remote SQL Server instance on which you are allowed to back up or restore a database;
  • sufficient space in your Plesk plan to accommodate the imported database.

SSMS is an administration tool. Installing it does not automatically create a SQL Server. You must also have a SQL Server instance to connect to.

LWS Windows hosting currently uses Microsoft SQL Server 2019.

A backup created with SQL Server 2022, SQL Server 2025, or another newer version cannot be restored directly on LWS's SQL Server 2019 server. [ADDRESS] version of SSMS used does not change [PERSON_NAME]>

Before replacing an existing database, create a recent backup of its contents. In Plesk, the [PERSON_NAME]> option deletes the current database before restoring the backup.

Transfer a database from Plesk to a SQL Server

Download the database from Plesk

  1. Log in to your Plesk panel.
  2. Open the Databases section.
    Transfer a SQL Server database between Plesk and a SQL Server server with SSMS
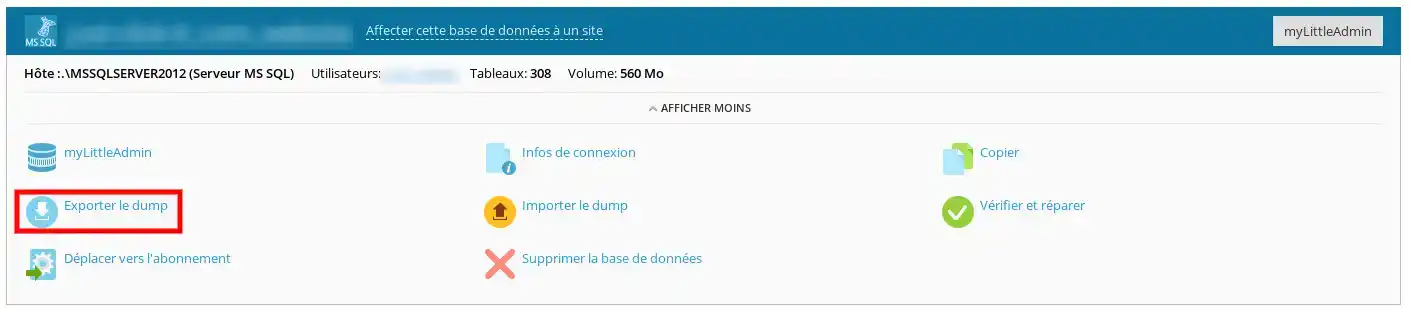
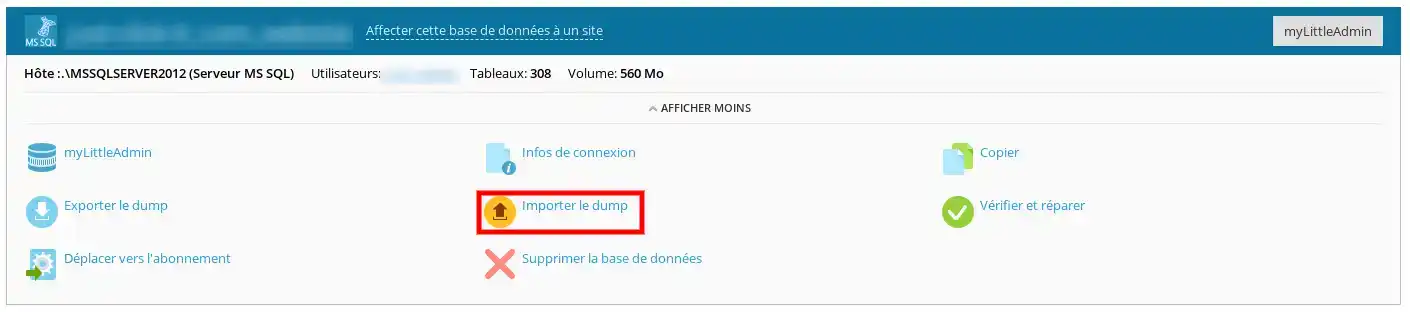
  3. [PERSON_NAME] the Microsoft SQL Server database you want to transfer, then click Export dump.
    Transfer a SQL Server database between Plesk and a SQL Server server with SSMS
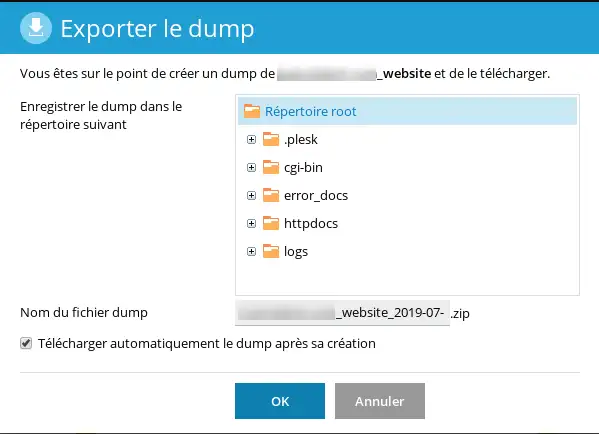
  4. Check the Automatically download the dump after creation option.
    Transfer a SQL Server database between Plesk and a SQL Server server with SSMS
  5. [PERSON_NAME] the export.

Plesk creates a ZIP archive containing the database backup, [PERSON_NAME] computer.

  1. [PERSON_NAME] the ZIP archive.
  2. [PERSON_NAME] the name of the resulting file. If this file has no extension, add .bak to the end of its name.

For example:

ma-base-sauvegarde becomes ma-base-sauvegarde.bak

Do not directly rename the ZIP archive to .bak. You must first extract the archive, then rename only the file it contains if it has no extension.

Restore the database in SSMS 22

  1. Open SQL Server Management Studio 22.
  2. Connect to the SQL Server instance on which you want to restore the database.
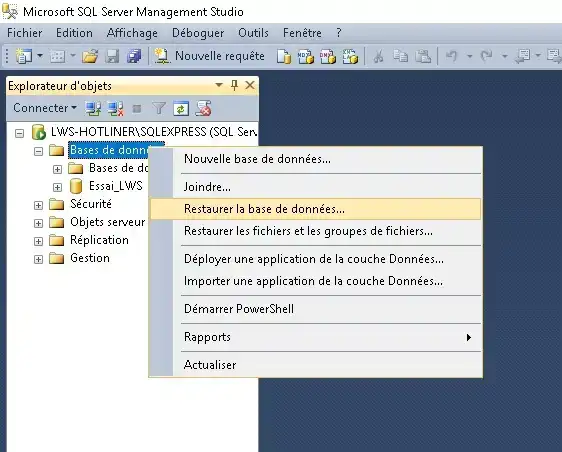
  3. In the [PERSON_NAME] explorer, right-click Databases.
  4. Click Restore Database.
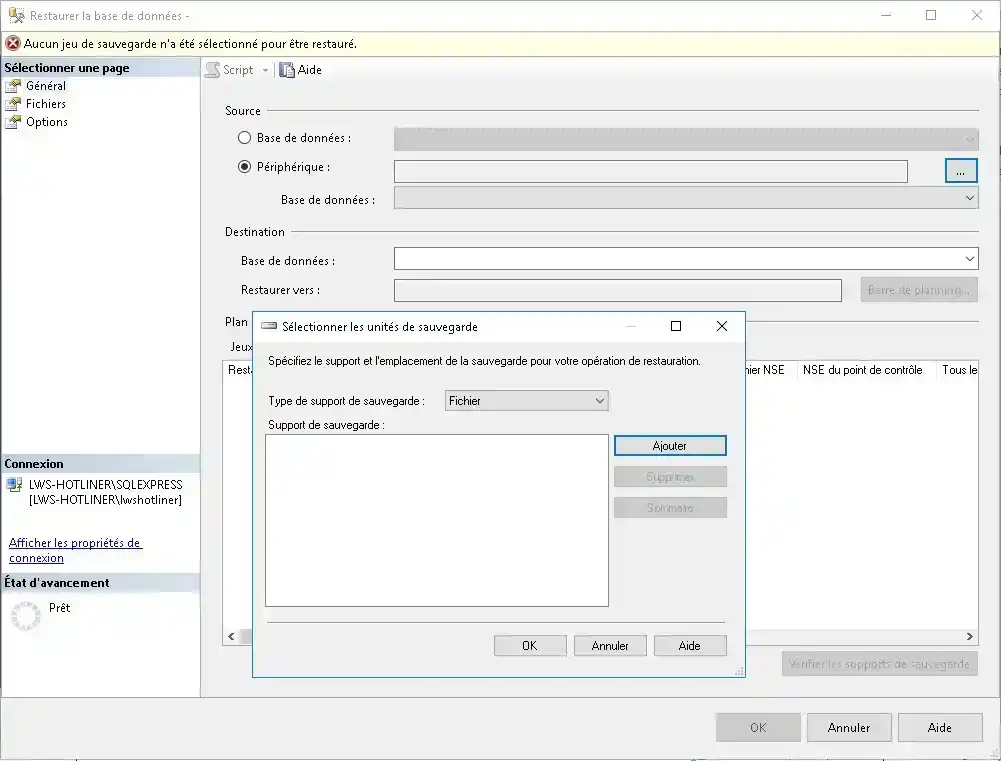
  5. In the Source section, select Device.
  6. Click the button.
  7. Verify that the selected media type is File, [PERSON_NAME] Add.
  8. Select the .bak file extracted from the Plesk archive.
  9. Click OK to return to the restore window.
  10. Verify that the backup set appears and is selected.
  11. In the Destination section, check the name of the database that will be created.

If a database with that name already exists, use another name so as not to overwrite its contents.

  1. Click OK to start the restore.
  2. Wait for SSMS to display a message confirming that the database was restored successfully.

[ADDRESS] menus correspond to the restore procedure documented for the current SSMS interface.

When SSMS is connected to a SQL Server instance installed on another computer, the selection window displays the files accessible by that SQL Server. The .bak file must therefore be placed in a folder accessible by the remote instance.

Transfer a database from a SQL Server to Plesk

Create a backup with SSMS 22

  1. Open SQL Server Management Studio 22.
  2. Connect to the instance containing the database to transfer.
  3. In the [PERSON_NAME] explorer, expand the Databases section.
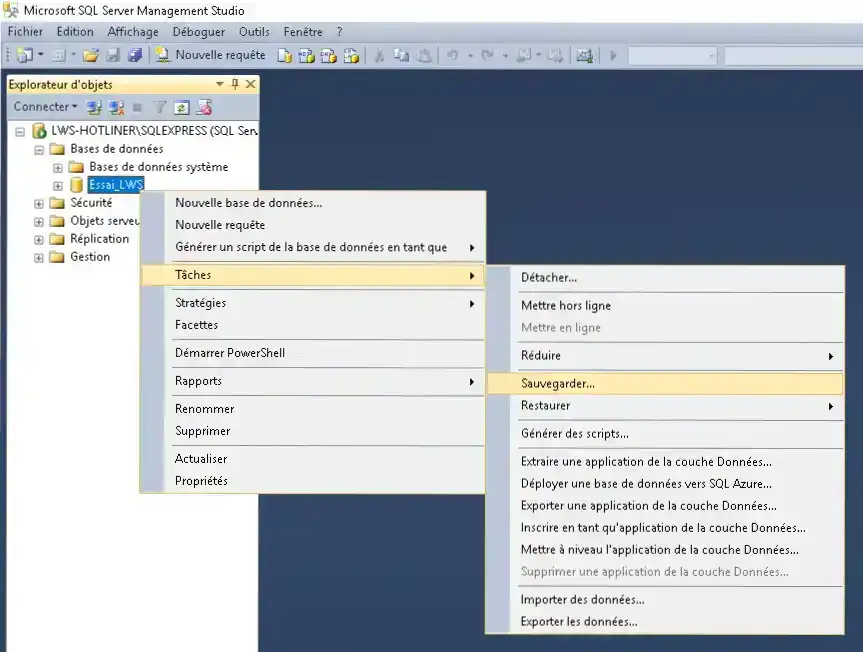
  4. Right-click the database concerned.
  5. Click Tasks, then Back Up.
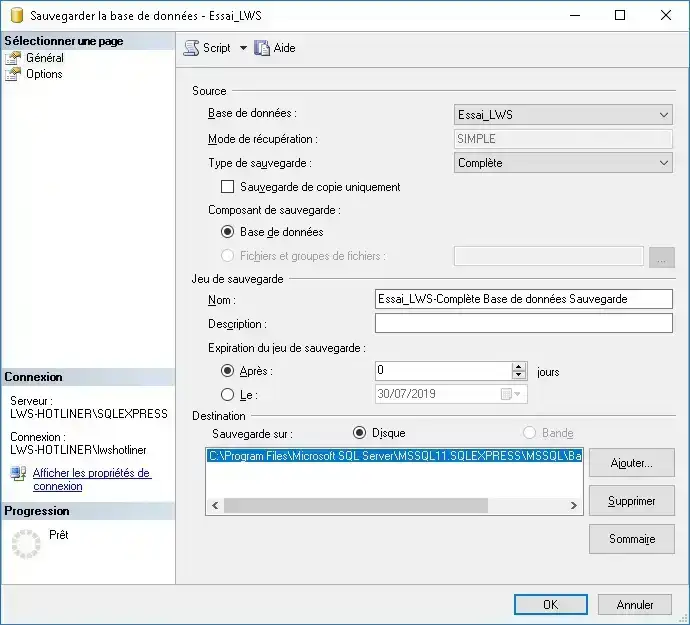
  6. In the Backup type field, select Full.
  7. In the Destination section, check that the Disk type is selected.
  8. Click Add.
  9. Specify the name and location of the backup file.

Use a [PERSON_NAME] ending with .bak, for example:

ma-base.bak

  1. Confirm the location, then click OK to start the backup.
  2. Wait for SSMS to confirm that the operation was successful.

The file is created on the computer hosting the SQL Server instance. [PERSON_NAME] remote, the file will not necessarily be saved on the computer from which you are using SSMS.

Import the backup into Plesk

Before importing, make sure the backup was created with SQL Server 2019 or an earlier compatible version.

  1. Retrieve the .bak file created with SSMS.
  2. [PERSON_NAME] only this file into a new ZIP archive.

For example:

ma-base.bak must be inside ma-base.zip

  1. Log in to your Plesk panel.
  2. Open the Databases section.
  3. [PERSON_NAME] the SQL Server database into which you want to import the backup.

The destination database must already exist. [PERSON_NAME], create a new SQL Server database before continuing.

  1. Click Import dump.
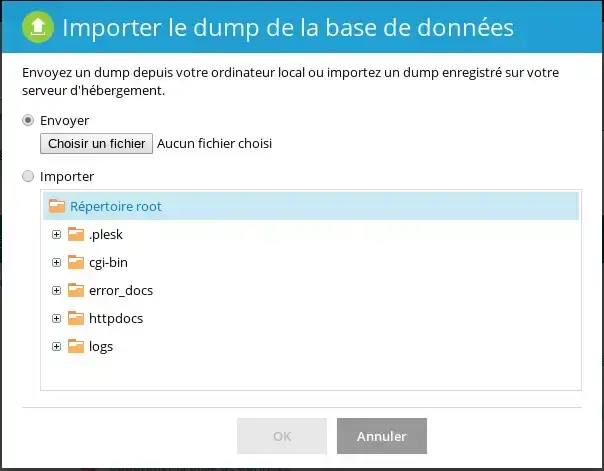
  2. Select the Upload option, depending on the language of your interface.
  3. Click Browse, then select the ZIP archive containing the .bak file.
  4. Leave the [PERSON_NAME] you do not want to delete the existing database. option.
  5. [PERSON_NAME] the import.
  6. Wait for Plesk to confirm that the operation is complete.

Plesk accepts the upload of a ZIP archive containing the backup file. The source database and destination database must use the same database engine.

Verify that the transfer was successful

After a restore in SSMS

In Object Explorer:

  1. Right-click Databases, [PERSON_NAME] Refresh.
  2. [PERSON_NAME] appears.
  3. [PERSON_NAME], then open the Tables section.
  4. Verify that the expected tables are present.
  5. [PERSON_NAME] complete.

After an import into Plesk

  1. Check that Plesk displays no error.
  2. Open the database with the SQL Server management tool provided in Plesk.
  3. Verify that the expected tables and data are present.
  4. Check the connection settings used by your site.
  5. Test a page or function that uses the database.

The transfer is complete when the database [PERSON_NAME], its tables are accessible, and your site or application can connect to it.

Common issues

The backup file does not appear in SSMS

Make sure you have:

  • extracted the ZIP archive downloaded from Plesk;
  • added the .bak extension to the extracted file if it had none;
  • placed the file in a folder accessible by the SQL Server instance.

If your SQL Server instance is remote, the file must be placed on the remote server or in a network location accessible from it.

SSMS says the backup version [PERSON_NAME] is incompatible

[ADDRESS] backup was probably created with a newer SQL Server version than that of the destination server.

A SQL Server 2022 or 2025 backup cannot be restored directly on SQL Server 2019. You must then transfer the structure and data using compatible scripts instead of directly using the .bak file.

The import is refused by Plesk

Check:

  • that you are indeed uploading a ZIP archive;
  • that the archive contains the .bak backup file;
  • that the destination database is a Microsoft SQL Server database;
  • that the database size complies with your plan limit;
  • that the maximum allowed number of databases has not been reached.

Current limits vary depending on the Plesk plan: the maximum database size ranges from 50 [ADDRESS] to 750 MB.

The database is imported, but the site does not connect to it

After the transfer, check the connection settings saved in your site:

  • the SQL server name;
  • the database name;
  • the username;
  • the password;
  • the port, if entered manually.

The credentials used on the original server are not [PERSON_NAME] those of the database created in Plesk.

Rate this article :

5/5 | 1 opinion

This article was useful to you ?

Article utileYes

Article non utileNo

MerciMerci ! N'hésitez pas à poser des questions sur nos documentations si vous souhaitez plus d'informations et nous aider à les améliorer.


Vous avez noté 0 étoile(s)

Similar articles

1mn reading

How do I create a database in Plesk?

0mn reading

How do I create an ODBC link in Plesk?

3mn reading

How do I export a database to Plesk?

6mn reading

How do I install [PERSON_NAME] ?


Questions sur cet article

Ask the LWS team and its community a question

RGPD : Responsable LWS-Ligne Web Services. Finalité : modération et publication publique de votre question, notification éventuelle d'une réponse. Base légale : consentement (art. 6.1.a RGPD). Conservation des emails : 90 jours après notification, 12 mois maximum sans réponse. Vous pouvez exercer vos droits via notre nos CGV - section RGPD.