Procédure
What is the email accounts tool?
Thanks to the Email Accounts tool available on cPanel, it is possible to create and manage custom email addresses.
The tool allows you to manage existing email addresses such as:
- Change email address quotas;
- Delete the email address;
- Block access to the mailbox;
- Block the receipt of emails;
- Fully suspend email service;
- Access Webmail to view emails. Access is done through the cPanel interface and does not require a password to log in;
- Access to a page allowing you to view the settings to use for configuring an email client, contacts, or the Caldav/carddav calendar;
- Bulk delete emails through a search using a filter.
In summary, this tool allows you to configure and modify the configuration of an existing email address.
How to Use the Email Accounts Tool?
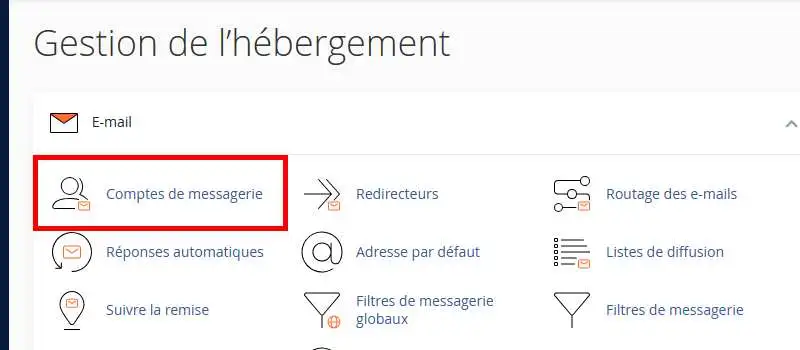
cPanel allows you to create custom email addresses for each domain name associated with the cPanel plan. To do this, log in to your cPanel interface and click on the "Email Accounts" tab found in the "Email" section.
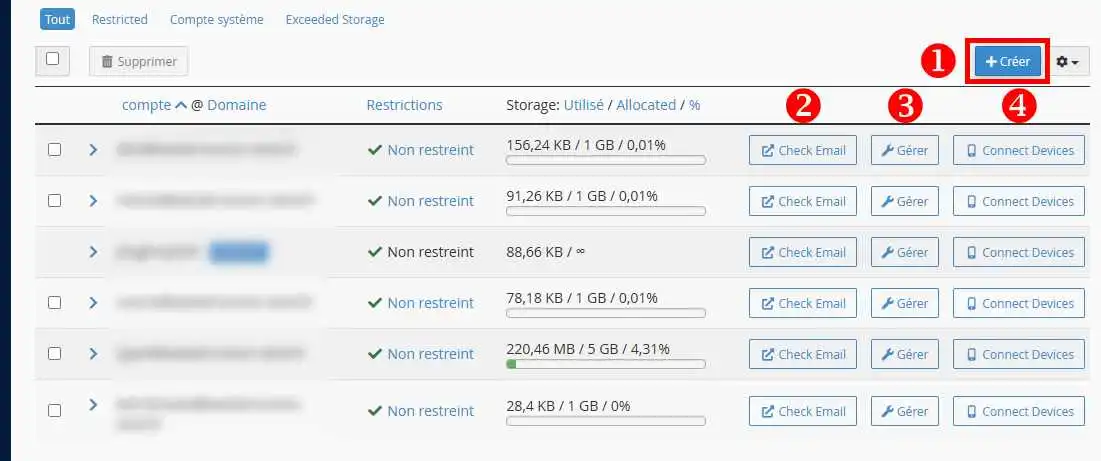
The "Email Accounts" page lets you view all the email addresses created on your cPanel plan. You can perform various actions on email addresses such as:
- Create (1) : Displays the window allowing you to create an email address;
- Check Email (2) : Allows you to log in to your email address without a password to view your emails;
- Manage (3) : Allows you to manage the email address, such as changing the password, modifying the quota, enabling or disabling certain restrictions, changing the method for managing the email account, and deleting the account;
- Connect Devices (4) : Provides configuration information for email addresses in software such as Outlook.
How to create an email address on cPanel?
Click on the "Create" button to access the mailbox creation form.
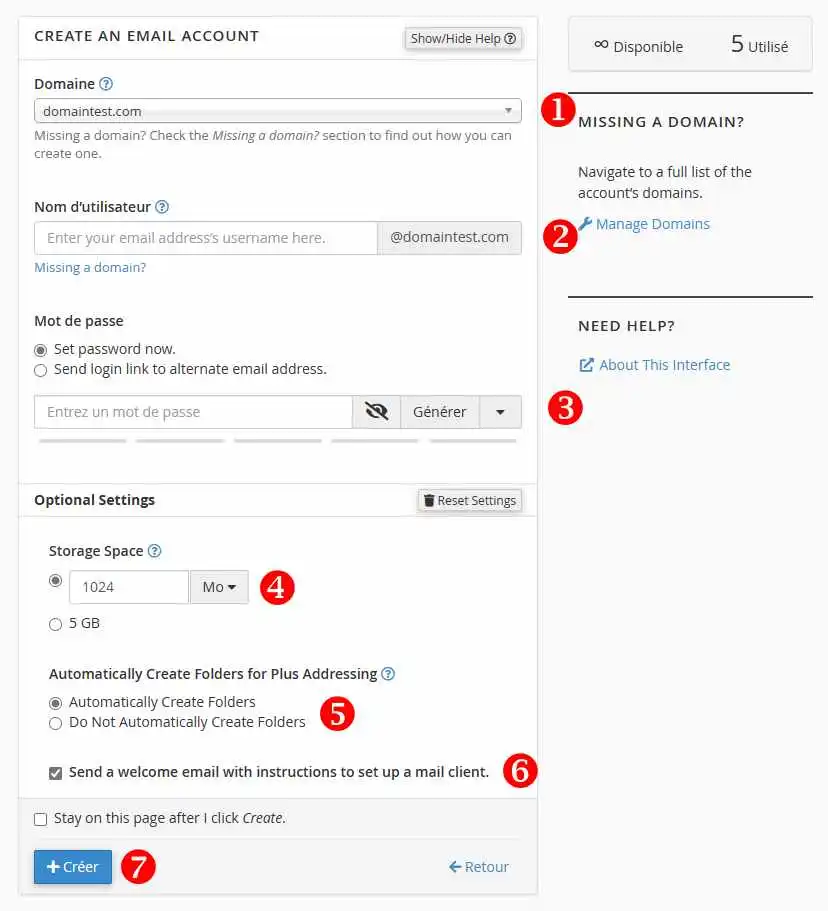
The email address creation form contains several fields that must be filled in as follows:
- Domain (1) : The domain field contains the list of all domains configured on cPanel, as an Alias or Additional Domain. Choose the domain name for which the email address should be created;
- Username (2) : This is the email address you want to create. Note that the domain name is already pre-filled, so you only need to fill in the first part of your address;
- Password (3) : This is the password associated with the email address you are going to create. You can generate an automatic password by clicking the "Generate" button located behind this field;
- Storage Space (4) : You can define a quota for your mailbox or use the maximum quota;
- Automatically Create Folder for Plus Adressing (5) : Defines the behavior to adopt in the case of plus addressing. plus addressing makes it possible to dynamically create several variations of an email address by adding +something after the username. For example, if your main email address is contact@domaine.com, the email address contact+something@domaine.com will also be delivered, as will contact+somethingelse@domaine.com. This can be very practical if you want to automatically sort emails into folders. Indeed, if you create a folder named LWS, an email arriving at contact+lws@domaine.com will automatically be sorted into the LWS folder of your email address;
- Send a welcome email with instructions to set up a mail client (6) : If you check this box, an email will be sent to the created email address with the configuration settings to use for setting up your mail client;
- Create (7) : Allows you to finalize the creation of your mailbox.
How to manage an email address on cPanel?
You can manage your email addresses by clicking the "Manage" button located behind the relevant email address.
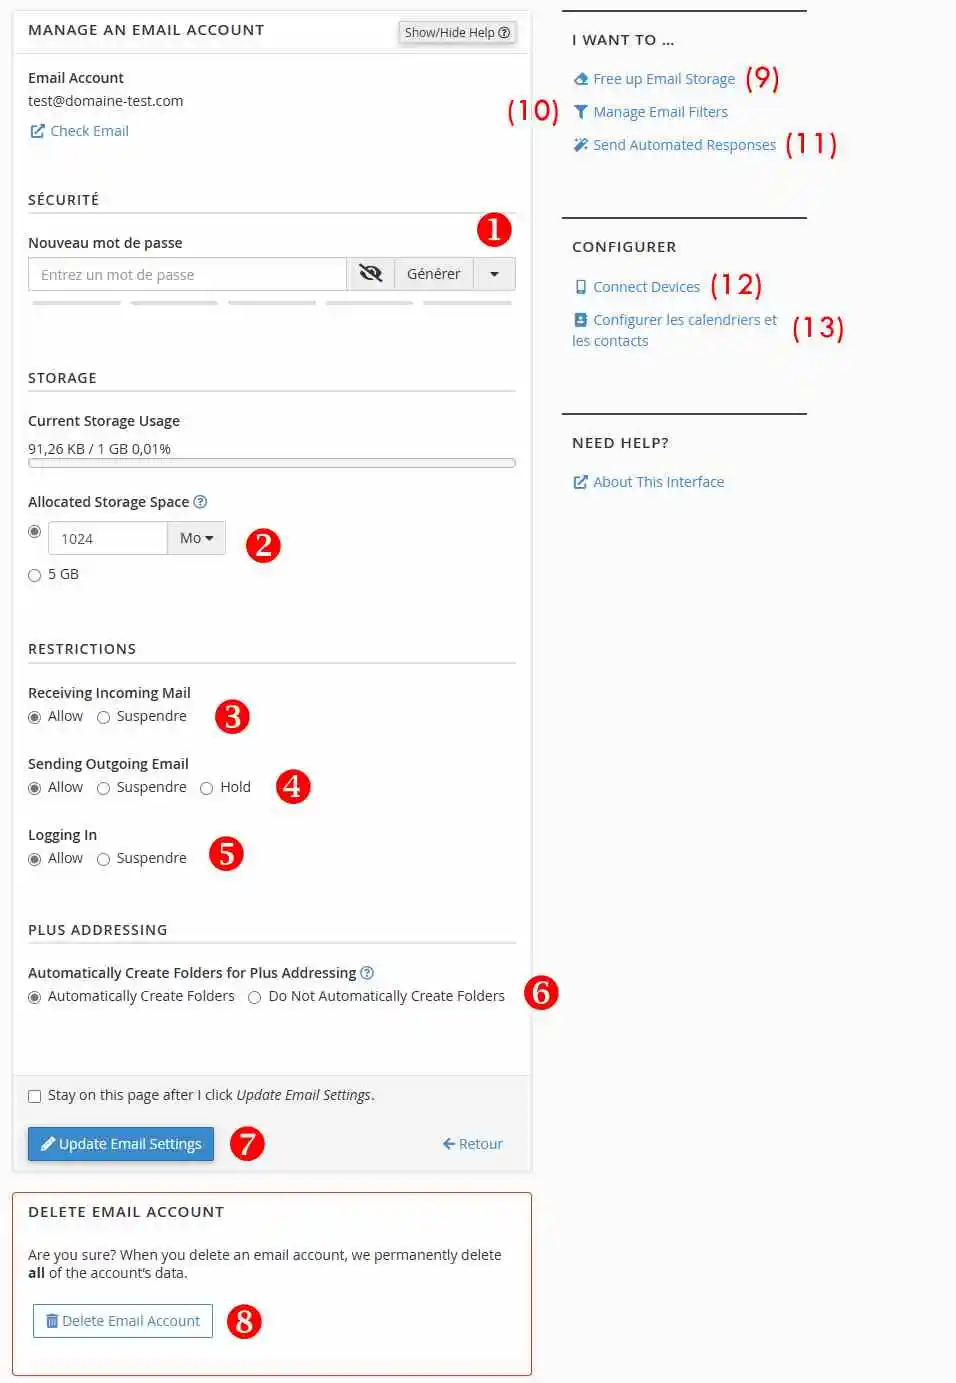
This section allows you to perform the following actions:
- New Password (1) : Allows you to change the password for your email address;
- Allocated Storage Space (2) : allows you to change the quota of your mailbox;
- Restrictions : It is possible to apply certain restrictions to your different mailboxes such as:
- Receiving Incoming Mail (3) : Prevents the reception of new emails in the mailbox concerned;
- Sending Outgoing Email (4) : Prevents sending email through the mailbox concerned;
- Logging In (5) : Blocks login to the email address;
- Automatically Create Folders for Plus Addressing (6) : Management of plus addressing which we discussed in the previous paragraph;
- Update email settings (7) : saves the changes made to your email address;
- Delete email account (8) : allows the email address to be deleted;
- Free up Email Storage (9) : Launches the tool that allows mass deletion of emails using predefined rules;
- Manage Email Filters (10) : Link providing access to the mail filters tool;
- Send Automated Responses (11) : Link providing access to the autoresponders tool;
- Connected Devices (12) : Displays the configuration usable for your mail client;
- Configure Calendars and Contacts (13) : Displays the calendar and address book configuration settings (caldav and carddav).
How to configure your mail client?
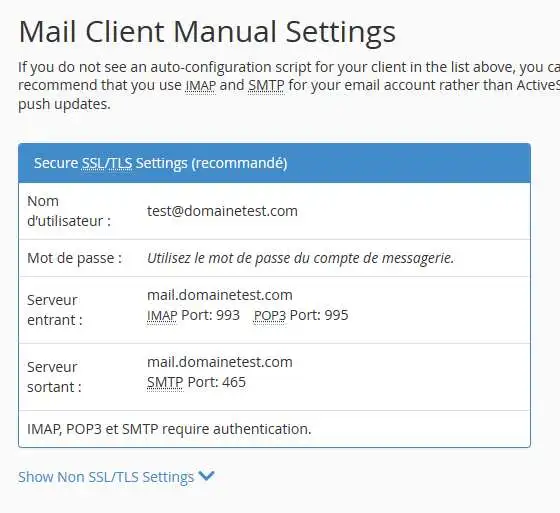
By clicking on "Connect Devices" available on the "Email Accounts" page, a page will display a manual configuration example allowing you to set up mail clients. The configuration information to use is as follows:
- Server name (IMAP, POP or SMTP) : The server is mail.domaine.com. Domaine.com should be replaced with your domain name;
- POP or IMAP : It is recommended to use IMAP. Indeed, it allows you to synchronize your emails with different devices, which is not the case with the POP protocol;
- If the configuration is in IMAP, the port will be as follows: 993 with SSL encryption ;
- If the configuration is in POP, the port will be as follows: 995 with SSL encryption ;
- For SMTP (outgoing server), the port is 465 with SSL encryption ;
- Authentication is required. The username corresponds to the full email address. The password is the one associated with the relevant email address.
Conclusion
You are now able to use the "Email Accounts" tool available on your cPanel plan. This tool allows the management (creation and configuration) of all mailboxes for all domains attached to cPanel as an Alias or Additional Domain.

 About LWS :
LWS is a 100% French web hosting company that focuses on quality and innovation and offers a responsive and competent technical service at affordable prices.
About LWS :
LWS is a 100% French web hosting company that focuses on quality and innovation and offers a responsive and competent technical service at affordable prices.



 Yes
Yes No
No