cPanel shared hosting11 October 2026By romain 4 min read
Accelerate your website speed with Fastest Cache - Varnish Cache
Procédure
Why speed up your site’s loading time?
It is good to know that your site’s loading speed is essential to ensure its success. For a business, for example, it gives visitors a first impression. In addition, excessively long loading times can have an impact on your site’s SEO on the major search engines and will not allow sufficient exposure for it to thrive.
There is no fixed threshold that your web pages should not exceed in terms of loading time. However, the loading time of most websites is under three seconds.
What is Fastest Cache and what is it for?
The Fastest Cache tool is a system designed and developed by LWS to optimize your website’s loading performance through the use of page cache mechanisms configured at the web server level. The tool combines the technologies provided by NGINX and Varnish.
NGINX is a performance-oriented web server capable of handling far more requests than Apache (see our blog post entitled “Apache VS Nginx: Performance Test”). It is mainly used in Fastest Cache to manage secure https access to your site, eliminate malicious HTTP requests (see LWS Protect) and route HTTP requests to Varnish cache servers.
Varnish is an HTTP service implementing a page caching mechanism that allows the result of an HTTP request to be cached in memory.
With the right configurations in place, NGINX allows more requests to be handled by your website, and Varnish both speeds up page loading time and reduces your CPU and memory usage.
How does the Fastest Cache service work?
1. How it works without cache
To better understand how it works, we will first look at what happens without a cache plugin so that the visitor can view your site.
Processing an HTTP request without Fastest Cache
11. The visitor requests the page from the web server. Example: index.php
22. The web server performs the necessary script executions (PHP, Perl, NodeJS, …)
33. The web server receives the result of the execution
44. The web server sends the HTML page resulting from the script execution
2. How it works with the Fastest Cache module
When Fastest Cache is enabled, a cache server is introduced between the visitor and the web server.
The goal is to reduce the number of script executions required by keeping the execution result in memory for future requests needing the same response. This means the same script no longer has to be executed multiple times to produce the same result.
As a result, we eliminate the waiting time caused by script execution from the page loading time, and at the same time, we save the resources used during script execution.
Processing an HTTP request with Fastest Cache
11. The visitor requests the page from the web server. Example: index.php
2. Fastest Cache checks whether the page has already been generated and stored in cache memory
If yes, the page is returned directly to the visitor without needing to access the web service and without executing the script
If not, the page is requested to be generated on the web service, which will result in the script being executed (PHP, NodeJS, Perl, Ruby, …).
33. Once the page is generated, Fastest Cache determines whether the page can be kept in cache (via headers, URL, …)
If yes, the page is stored in cache memory and sent back to the visitor
If not, the page is stored in microcache memory (short-lived cache memory) and sent back to the visitor
It can be seen that when a page is stored in cache memory, processing by the web server as well as script execution is avoided.
Cacheable, non-cacheable and microcache
When the web service provides a new response to Fastest Cache, it is analyzed to determine whether or not it should be stored in cache memory for future use.
Some page content should not be stored in cache memory, such as the result of a registration form, the result of a payment page, … because they contain data that varies depending on the user and the event.
To determine whether a page can be cached or not, Fastest Cache uses several mechanisms:
HTTP requests using HTTP verbs other than HEAD and GET will be systematically excluded from the cache.
HTTP requests including cookies will also be excluded. Cookies used by Google Analytics, XiTi, DoubleClick, Quant Capital, AddThis and Cloudflare are removed before detection. Likewise, cookies related to known CMSs are handled automatically if the caching mode matches the CMS.
HTTP requests protected by .htaccess passwords
If the web server response contains browser cache instructions (cache-control header), it will automatically be taken into account by Fastest Cache and the page will be kept in cache memory.
If an HTTP request is of the GET type and is neither protected by .htaccess nor contains cookies, and has no specific browser cache instructions, it is kept in microcache for a few seconds.
Microcache thus helps address request spikes on uncached pages. For example, it helps resolve overloads and slowdowns in the event of a wave of searches for the same product on an ecommerce store.
Presentation of the interface and service activation
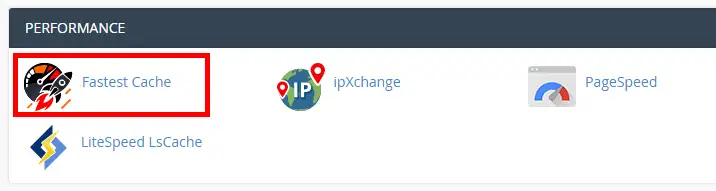
Fastest Cache appears as an icon in cPanel in the “Performance” section.
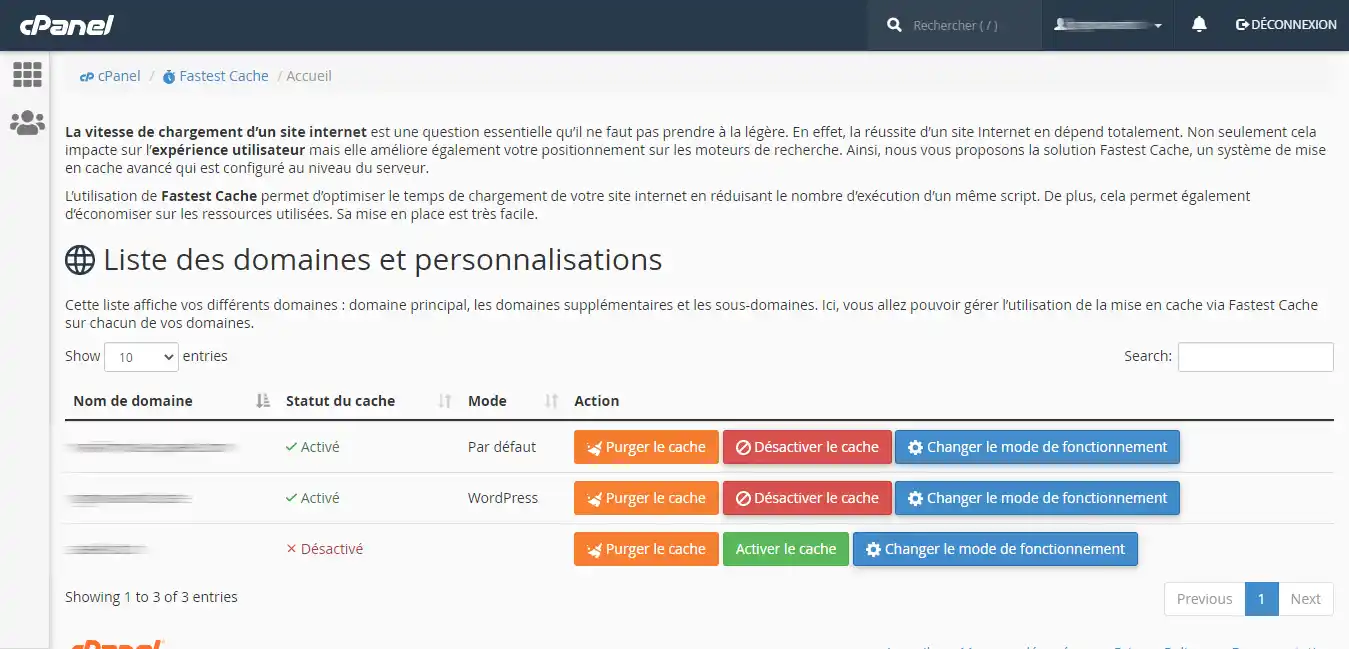
Once in the interface, the main domain, additional domains and subdomains are displayed in the list.
The “Cache status” column shows the cache activation status. If it is set to “Enabled”, then the cache is active.
The “Clear cache” button allows you to delete all cached data for that particular domain name.
The “Disable cache” button allows you to disable caching.
The “Enable cache” button allows you to enable caching.
The “Change operating mode” button allows you to modify the behavior of the cache system. These modes will be explained right after.
The different cache modes
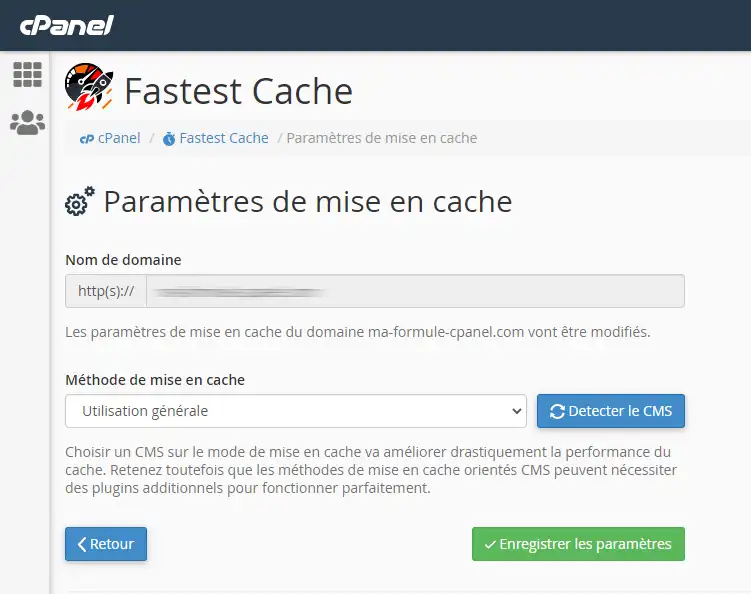
By default, the cache system uses the “General use” mode, which is suitable for general use. However, there are other modes:
Developer mode: identical to disabling the cache, this allows you to bypass the cache system during development periods. WordPress: a cache mode better suited to WordPress, where the handling of folders (wp-content, wp-admin, …) and WordPress-specific cookies is improved. Prestashop : a cache mode better suited to Prestashop, where folder and cookie handling is improved.
Cache purge
In addition to the cPanel interface for clearing the cache, it is possible to manually purge the cache from the cPanel account’s SSH terminal or from a script hosted on the server.
When launched from your hosting account (PHP script from your site, Cron task or SSH terminal), these methods require neither API token nor credentials: Fastest Cache directly accepts the HTTP methods PURGE and FULLPURGE. The lwsapitoken token only applies to LWS Cache, the cache of the LWS Panel (see this help article).
1. Cache purge with cURL
Clear the cache of a page:
⌨ Command
curl -X 'PURGE' http://my-website.com/mypage.php
This will clear the cache for the URL http://my-website.com/mypage.php.
This will clear all caches for URLs beginning with 'http://my-website.com/wp-content/uploads/'
Clear the cache of a site
⌨ Command
curl -X 'FULLPURGE' http://my-website.com
For all three of these commands, two responses are possible:
HTTP code 200: the purge completed successfully without error.
HTTP code 405: the purge is not allowed or was not performed.
2. Automatic purge with a PHP script (Cron task)
The following script empties the cache for the entire site, or just a few pages. Copy it into a purge-cache.php file on your hosting account, then enter your domain in $site. To purge only certain pages, list them in $pages.
To run it automatically, for example every night, create a Cron task that executes this file with PHP. If you simply want to empty the entire cache, the Cron task can also directly execute:
⌨ Command
curl -s -X FULLPURGE https://my-website.com
3. Purge with a plugin or module
The majority of plugins/modules with Varnish integration are compatible with Fastest Cache’s internal purge mechanism.
Here are some tested and verified compatible plugins:
The HTTPS status and ports indicated on Apache are modified by the mod_fastestcache module integrated into Apache. It is therefore generally not necessary to make changes.
However, if HTTPS detection does not work with Fastest Cache, this can cause infinite redirect loops. Therefore, it will be necessary to modify the detection data.
The trusted HTTP headers for detection are:
X-Forwarded-Proto
X-Forwarded-Port
So, if you use the following HTTPS redirect with a .htaccess:
Code
RewriteEngine On
RewriteCond %{SERVER_PORT} ^80$
RewriteRule ^(.*)$ https://%{SERVER_NAME}%{REQUEST_URI} [L,R]
and if that does not work, you can replace the SERVER_PORT variable with X-Forwarded-Proto:
Bonjour
vous indiquez à la fin de votre article, qu’il faut utiliser un seul niveau de cache, donc je ne comprend pas si on peut utiliser cloudflare avec Fastest cache au niveau du serveur ou pas ?
F✓
fabrice-LWS Official answer
20 Sept 2022
Bonjour, il est préférable d'utiliser qu'un système de cache afin de ne pas rencontrer de problème. L'utilisation de plusieurs systèmes de cache différents est souvent contre-productif et peut engendrer différents problèmes comme le blocage de certaines requêtes telles que celles permettant de purger le cache d'une page de votre site ou toutes les pages.
Was this answer helpful?
R
raf
19 Sept 2022
Et au niveau du plug-in wordpress
WP Rocket : est il compatible ?
F✓
fabrice-LWS Official answer
20 Sept 2022
Bonjour, le plugin WP rocket est compatible avec Fastest Cache.
Was this answer helpful?
A question about this article?
Ask the LWS team and the community. Answers are published after moderation.
Ask the LWS team and its community a question
!
To enable this form, please tick the two consent boxes below.





 Yes
Yes No
No About
About 