
Online help
The web host accessible to all
Procédure
On LWS Panel, the folder of a subdomain is fixed: /htdocs/app.exemple.com/ for app.exemple.com, and it cannot point to Laravel’s public/ folder. To publish the Laravel application you developed, put the whole project in this folder, add at its root the .htaccess file that sends visitors to public/, install the dependencies with Composer in the Terminal, then configure the .env file. This guide details these steps and how to investigate the cause of a 500 error.
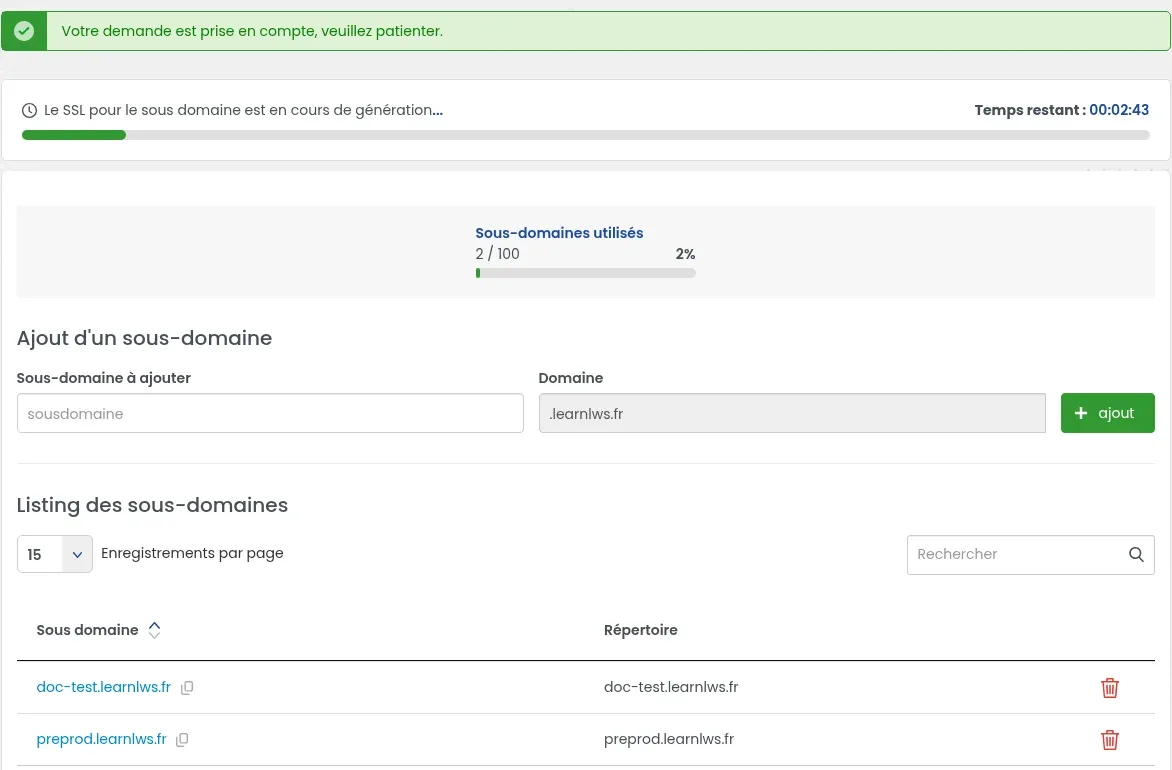
In your hosting dashboard, under “Domain management”, open “Subdomains”. In “Subdomain to add”, type only the part before the domain (for example app), then click “+ add”. The subdomain SSL certificate is generated in about 3 minutes: a “Time remaining” countdown is displayed.
The “Directory” column shows the subdomain folder: app.exemple.com, that is /htdocs/app.exemple.com/. No field lets you choose another folder. Details for this screen are in the guide How do I create subdomains on LWS Panel?
Upload the complete project (folders app, bootstrap, config, public, routes, storage, files artisan and composer.json…) directly into /htdocs/app.exemple.com/. Laravel’s index.php file must be located at /htdocs/app.exemple.com/public/index.php.
With the File Manager (section “Files”), upload a .zip archive of the project using “Upload” (up to 1,125 MB per file), select it, then click “Extract”. For a very large number of files, FTP software is better. If your project is on Git, you can also clone it from the Terminal: see How to use GIT with the Web terminal on my LWS shared hosting?
Because the subdomain folder cannot point to public/, a .htaccess file placed at the root of /htdocs/app.exemple.com/ (next to the public folder, not inside it) redirects visitors to public/. Its content is provided in the guide Install Laravel on LWS shared hosting, section “How do I properly configure my Laravel site?”.
In the File Manager, open the subdomain folder, click “+ File” and name it .htaccess. Then click its name to open it in the “Code Editor”, paste the content, and click “Save changes”.
Do not modify the .htaccess file already in public/: it is included with Laravel and sends requests to index.php.
Under “Databases & PHP”, open “php Configuration”. In the “PHP installation and selection” tab, make sure the desired version is checked (for example “PHP 8.5 + Ioncube (recommended)”). In the “PHP configuration by site” tab, then choose this version on the line for your subdomain, and click “Save”.
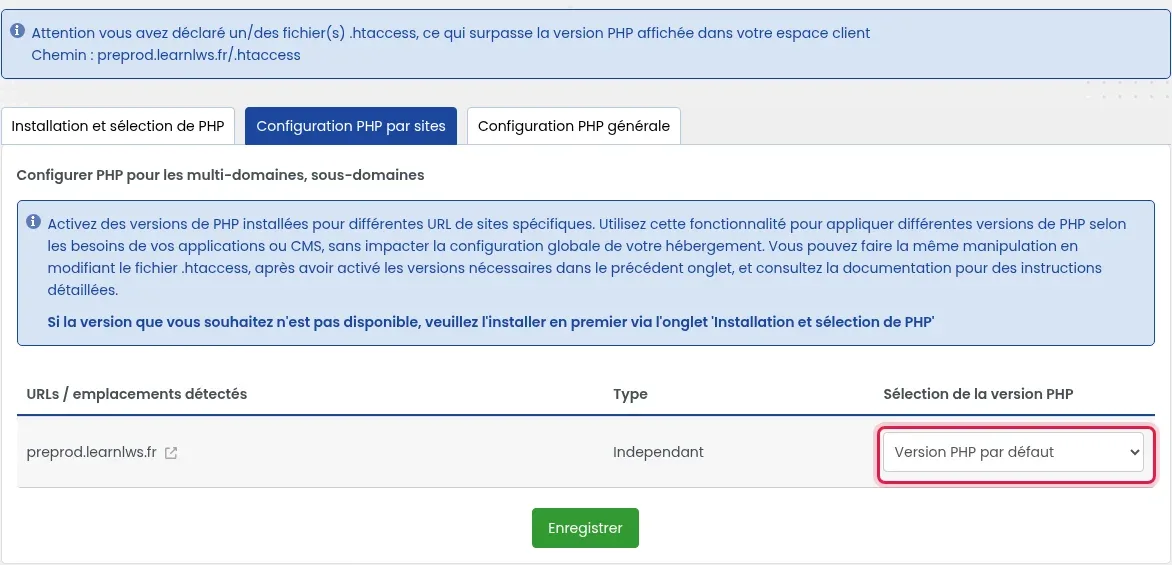
If a banner says “Warning: you have declared .htaccess file(s), which override the PHP version displayed in your customer area”, the PHP version for this folder comes from a line in the .htaccess file whose path is shown: this is the line you need to edit. More details in How do I configure PHP on my hosting?
Open “Software” then “Terminal”. The console starts in the ~/htdocs folder. Go to the subdomain folder, display the console’s PHP version, then install the project dependencies:
cd app.exemple.com
php -v
composer install
The version shown by php -v must be compatible with your Laravel version. Otherwise, change the Terminal PHP version by following How to change the PHP version in LWS Panel Web Terminal.
The .env file is located at the project root (/htdocs/app.exemple.com/.env), not in public/. Open it in the File Manager and set at least these lines with your site’s values:
APP_DEBUG=false
APP_URL=https://app.exemple.com
DB_CONNECTION=mysql
DB_HOST=203.0.113.10
DB_DATABASE=nom_de_la_base
DB_USERNAME=utilisateur_de_la_base
DB_PASSWORD=mot_de_passe_de_la_base
Database values can be found under “Databases & PHP” then “MySql & Phpmyadmin”, on the database row: column “Database” for DB_DATABASE, “User” for DB_USERNAME and “Server IP” for DB_HOST (an IP address, not localhost). The password is not displayed: it was sent to you by email when the database was created. If you lost it, change it from the “⋮” menu then “Change password”.
In the .env file of a fresh Laravel 13 project, the DB_CONNECTION line is sqlite and the other DB_ lines start with a #: remove those # characters and set mysql. For email sending, the MAIL_ lines are explained in the guide Install Laravel on LWS shared hosting.
If the APP_KEY= line is empty, generate the application key in the Terminal, still in the subdomain folder. Do not regenerate it if it is already filled in.
php artisan key:generateThen create the database tables, and cache the configuration:
php artisan migrate
php artisan config:cache
After every change to the .env file, run php artisan config:cache again: once the configuration is cached, Laravel no longer rereads the .env file.
Open https://app.exemple.com in your browser: the home page of your application appears, with the SSL certificate padlock. Browse a few pages and check that the styling and images display.
Also check that the project files cannot be read from the Internet: the address https://app.exemple.com/composer.json should display an error page from your application, not the file contents. If the contents are displayed, the .htaccess file from step 3 is missing or in the wrong place: fix it immediately.
Follow the steps in order and stop as soon as the error disappears.
Under “Databases & PHP”, click “Apache PHP ModSecurity Logs”: the LWS Log Analyzer tool opens. Open the “PHP Errors” tab, choose your subdomain in the domain list and the period, then the “Fatal” filter. The “PHP FILE”, “LINE” and “MESSAGE” columns provide the cause, and the “✨ AI Diagnostic” button explains it in simple language.

Laravel writes its own errors in the project file storage/logs/laravel.log. Open it in the File Manager and look at the latest lines, at the time of the error. If there is nothing at that time, rely on the “PHP Errors” tab from the previous step.
APP_KEY= line): run php artisan key:generate in the Terminal, in the subdomain folder.storage and bootstrap/cache folders not writable: Laravel must be able to write to them. Check their permissions with the File Manager “Permissions” button.vendor folder missing: run composer install in the subdomain folder (step 5).DB_HOST, DB_DATABASE, DB_USERNAME and DB_PASSWORD with the database line in “MySql & Phpmyadmin”, then run php artisan config:cache again.For other causes of 500 errors, see How to fix a 500 error on your site with LWS Panel.
No. On LWS Panel, a subdomain folder uses its full name (/htdocs/app.exemple.com/) and the “Subdomains” screen does not let you choose another one. That is why the .htaccess file in step 3 sends visitors to public/.
These commands are run in the LWS Panel Terminal (“Software” then “Terminal”), or via SSH from your computer starting with the Starter plan. If the Terminal displays “To use this tool, you need to upgrade to a higher plan”, it is not included in your plan. The Domaine plan has neither PHP nor a database: Laravel does not work on it.
The configuration is cached: run php artisan config:cache again in the subdomain folder, or clear this cache with php artisan config:clear.
Pull the changes from the Terminal, as explained in How to use GIT with the Web terminal on my LWS shared hosting?, then run composer install, php artisan migrate and php artisan config:cache again in the subdomain folder.
Ask the LWS team and the community. Answers are published after moderation.
 About LWS :
LWS is a 100% French web hosting company that focuses on quality and innovation and offers a responsive and competent technical service at affordable prices.


 Yes
 No