
Online help
The web host accessible to all
Procédure
If installing an application with the LWS Panel auto-installer stops before 100%, wait a few minutes and then try again. If the message « Impossible d'effacer le dossier de destination » appears, the folder where you are installing already contains files: keep a copy of them, empty it, or choose another subdomain, then try again. This help also explains how to delete an installed application and what to clean up afterward (folder, database, subdomain). Follow the sections in order and stop as soon as your installation works.
After clicking INSTALLATION, the « Installation du site en cours... » screen shows a percentage. In this case, the progress bar stops (for example at 5% or 30%), then the installation form reappears, without an error message.
During our tests, this blockage occurred just after creating the subdomain in the form (link + Créer), and a new installation launched a few minutes later worked. If you have just created the subdomain, wait a few minutes before trying again.
In the Software section, click Auto-installer, then SELECT under the application. Make the same choices (subdomain, domain, administrator account), then click INSTALLATION. Stay on the page until 100%: the panel indicates that « the process may take 1 to 2 minutes ».
Each attempt creates a database, even if it is interrupted. Once your application is installed, delete any databases left empty (see the « Clean up what is left » section).
If the form comes back again or if the message « Impossible d'effacer le dossier de destination » appears, go to the next section to check that the subdomain folder is empty.
The full message is: « Impossible d'effacer le dossier de destination. Changez de dossier ou supprimez-le manuellement. » The folder for the chosen domain or subdomain already contains files, for example remnants of an interrupted attempt, that the auto-installer cannot delete. You have two options: install on another subdomain, or empty this folder.
In the Files section, click File Manager, then the htdocs folder. Each subdomain has its own folder, named after the full subdomain (for example htdocs/boutique.mondomaine.fr). An installation on your main domain uses a folder named after your domain (for example htdocs/mondomaine.fr).
Click the folder name to view its contents. The Modified on column helps you identify the files left by your attempt: they bear its date and time.
If this folder contains files you want to keep (images, documents, old site), download them first to your computer, for example with FileZilla: see how to back up your site’s web files via FTP. If you are unsure about a file, keep a copy of it.
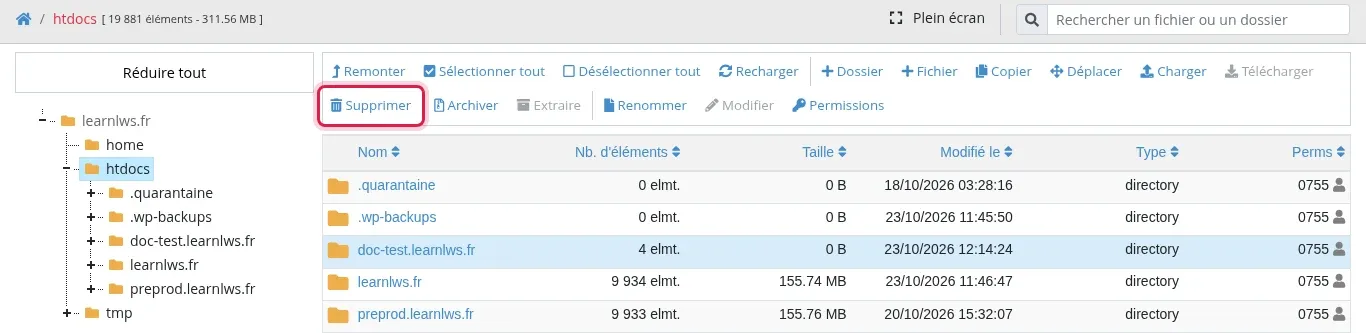
Still in the relevant folder, click Select all, then Delete. The « Delete confirmation » window lists the selected items: check that they are indeed in the desired subdomain folder, then click Confirm. A deleted folder is deleted with all its contents.
Return to the auto-installer and restart the installation on the same subdomain.
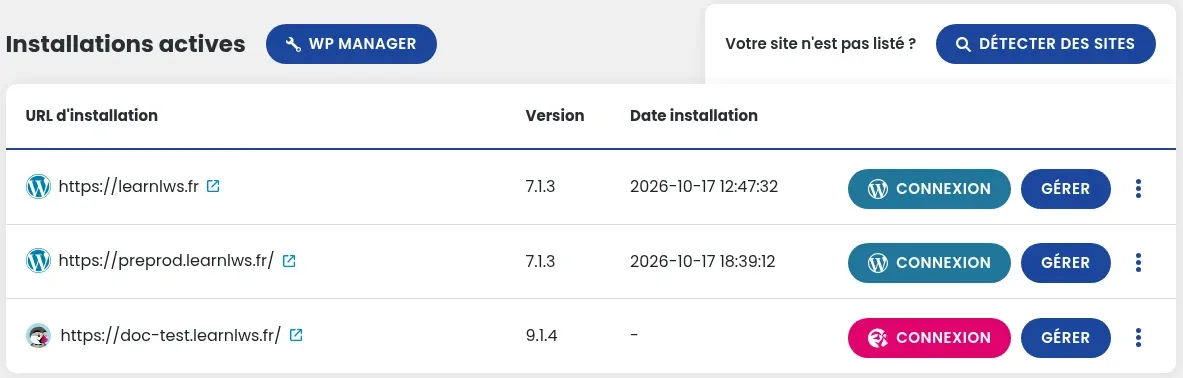
In the Software section, click Auto-installer, then SEE ACTIVE INSTALLATIONS. Find the line for the application to delete using the Installation URL column.
Click the three vertical dots ⋮, to the right of the MANAGE button, then click “Delete instance” followed by the application name (for example Delete PrestaShop instance or Delete WordPress instance). The menu may display over the neighboring line: check the application name before clicking.
In the « Delete installation » window, type Delete in the field, then click CONFIRM DELETION. To cancel, click CLOSE.
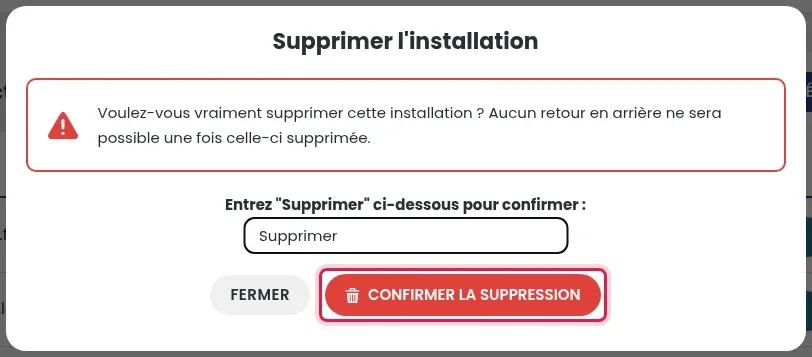
The message « Suppression du site en cours, veuillez ne pas quitter cette page... » appears with a progress bar. Stay on the page until 100%.
For WordPress, you can also use WP Manager: the site’s MANAGE button, ESSENTIAL tab, Delete installation. See the WP Manager presentation.
Deletion removes the application database, but not always everything else. An interrupted installation attempt may also leave files and an empty database. Check these three points.
After deletion, the subdomain folder may still contain a few items: an empty admin subfolder for PrestaShop (its name begins with « admin »), a default_index.html file for a WordPress deleted from WP Manager. As long as this folder contains files, the application may reappear in Active installations, without an installation date (« - »), with a menu reduced to « Change password ».
Open File Manager, then the subdomain folder, and make sure it no longer contains anything you want to keep (if so, download it first). Go back to htdocs, click the folder line (not its name) to select it, then click Delete. Check the path shown in « Delete confirmation », then click Confirm. The line then disappears from the active installations list.
In the Databases & PHP section, click MySql & Phpmyadmin. In the « List of your MySql databases » table, the Database size column shows 0 MB for an empty database. Before deleting a database, make sure no site is using it: for WordPress, WP Manager shows its database in the ADVANCED tab, « Database information » block, « MySQL database » line. If in doubt, export the database before deleting it.
To delete a database, click ⋮ at the end of its line, then Delete. Check the name shown in « Please confirm deletion », then click Confirm. Details are in the help article how to delete a MySQL database.
Uninstalling does not delete the subdomain. If you no longer need it, open Subdomains in the Domain management section, click the red trash bin at the end of its line, then Confirm. The panel indicates a delay of 1 to 24 hours (DNS propagation). Deleting the subdomain does not delete its folder: perform step 1 if that has not already been done.
An installation on the main domain creates a folder named after your domain and places the application files there. The files and subfolders you had placed yourself at the root are then no longer accessible from a browser. Move them into this new folder with FileZilla or the file manager. Details are in the help article how to install WordPress with the LWS auto-installer.
Yes, but the form warns: « Installing at the root of your domain will delete the existing files there. » First download a copy of your files and export your database. To try safely, install on a subdomain instead.
The list only shows applications installed by the auto-installer since July 6, 2023. The DETECT SITES button is used to add the others, but the panel warns that a site that was not added by the auto-installer cannot be deleted from this page. Then delete its folder, then its database, as in the « Clean up what remains » section, after keeping a copy of it.
Open a ticket from your client area indicating the application, the chosen address (subdomain and domain), the date and time of the attempt, and the displayed message or a screenshot. If attaching the screenshot fails, copy the exact text of the message.
Ask the LWS team and the community. Answers are published after moderation.
 About LWS :
LWS is a 100% French web hosting company that focuses on quality and innovation and offers a responsive and competent technical service at affordable prices.


 Yes
 No